
Its advisable to first go through drum brake inspecting and testing procedure.
The details are as follows :---
For the the procedure is mentioned in the ;link below :----
http://repairhelpcenter.blogspot.in/2012/02/how-to-inspect-brake-drums.html
For drum brake testing,click the link below :----
http://repairhelpcenter.blogspot.in/2012/02/how-to-test-drum-brakes.html
Now for drum brake servicing,click the link below :-----
CAUTION
In every case, road test the vehicle after any brake work to make sure the brake system is working safely and properly.When servicing wheel brake parts, do not create dust by cleaning with a dry brush or compressed air.
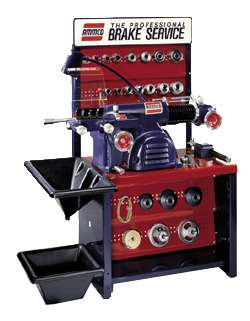 Brake drums can be resufaced by grinding or turning them on a brake lathe. Courtesy of Hennessy Industries, Inc.
 The drum's discard diameter is stamped on the drum.
 Typical duo-servo drum brakes.
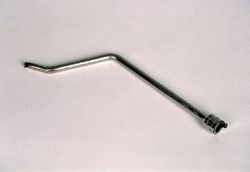 A brake spring tool.
Mark the shoe positions if shoes and linings are to be reused. When disassembling an unfamiliar brake assembly, work on one wheel at a time and use the other wheel as a reference.Do not use ordinary grease to lubricate drum brake parts. It does not hold up under high temperatures.
This details will help.
Thanks.
See below latest car help solutions :----
Replace door stay assemblies on
http://repairhelpcenter.blogspot.com/2012/01/replace-door-stay-assemblies-on-toyota.html
How to Inspect breather filter?
http://repairhelpcenter.blogspot.in/2012/02/how-to-inspect-breather-filter.html
Acceleration lag problem?
http://repairhelpcenter.blogspot.com/2012/01/acceleration-lag-problem.html
How to Replace rear quarter glass on
http://repairhelpcenter.blogspot.com/2012/01/how-to-replace-rear-quarter-glass-on.html
Overdrive light in the dash blinks?
http://repairhelpcenter.blogspot.com/2012/01/overdrive-light-in-dash-blinks.html
Front Suspension diagrams?
http://howtobyme.blogspot.in/2012/02/front-suspension-diagrams.html
No pulse to injectors?
http://technoanswers.blogspot.com/2012/01/no-pulse-to-injectors.html
How to bypass immobiliser on Rover 200?
http://technoanswers.blogspot.com/2012/01/how-to-bypass-immobiliser-on-rover-200.html
HVAC Control panel has no power on 2000
http://technoanswers.blogspot.in/2012/01/hvac-control-panel-has-no-power-on-2000.html
Stabilizer Bar Sway Bar & Links removal and installation procedure for all types of Mitsubishi car models?
http://howtobyme.blogspot.in/2012/02/stabilizer-bar-sway-bar-links-removal.html
Mercedes Benz 300TD wagon Diesel model will not start?
http://technoanswers.blogspot.in/2012/02/mercedes-benz-300td-wagon-diesel-model.html
After disconnecting and reconnecting battery Mercedes will not start?
http://technoanswers.blogspot.in/2012/02/after-disconnecting-and-reconnecting.html
Dodge vehicle will not start after sitting overnight?
http://technoanswers.blogspot.in/2012/02/dodge-vehicle-will-not-start-after.html
Engine seized due to oil burning?
http://technoanswers.blogspot.in/2012/02/engine-seized-due-to-oil-burning.html
Problem with cam synchronizer on 1996 Ford Taurus
http://technoanswers.blogspot.in/2012/01/problem-with-cam-synchronizer-on-1996.html
Hood clear coat peeling off?
http://repairhelpcenter.blogspot.com/2012/01/hood-clear-coat-peeling-off.html
Engine stumbles coming off idle when warm?
http://repairhelpcenter.blogspot.com/2012/01/engine-stumbles-coming-off-idle-when.html
What is Bug deflector?
http://repairhelpcenter.blogspot.in/2012/02/what-is-bug-deflector.html
How to Refit Rear seat on Rover 600?
http://repairhelpcenter.blogspot.com/2012/01/how-to-refit-rear-seat-on-rover-600.html
How to replace the speakers on 2011 Ford Edge?
http://technoanswers.blogspot.com/2012/01/how-to-replace-speakers-on-2011-ford.html
How to Remove Rear seat on Rover 600?
http://repairhelpcenter.blogspot.com/2012/01/there-are-3-10mm-bolts-at-back-of-seats.html
Hub, Bearing & Steering Knuckle removal on Mitsubishi car models?
http://howtobyme.blogspot.in/2012/02/hub-bearing-steering-knuckle-removal-on.html
How to replace Lower Control Arms on Mitsubishi car models?
http://howtobyme.blogspot.in/2012/02/how-to-replace-lower-control-arms-on.html
http://technoanswers.blogspot.com/2012/01/toyota-solara-rattling-in-rear.html
Parking light stay on constantly?
http://repairhelpcenter.blogspot.com/2012/01/parking-light-stay-on-constantly.html
The details are as follows :---
For the the procedure is mentioned in the ;link below :----
http://repairhelpcenter.blogspot.in/2012/02/how-to-inspect-brake-drums.html
For drum brake testing,click the link below :----
http://repairhelpcenter.blogspot.in/2012/02/how-to-test-drum-brakes.html
Now for drum brake servicing,click the link below :-----
CAUTION
In every case, road test the vehicle after any brake work to make sure the brake system is working safely and properly.When servicing wheel brake parts, do not create dust by cleaning with a dry brush or compressed air.
Drum Refinishing
- Brake drums can be refinished by either turning or grinding on a brake lathe.
- Only enough metal should be removed to obtain a true, smooth friction surface. When one drum must be machined to remove defects, the other drum on the same axle set must also be machined in the same manner and to the same diameter so braking is equal.
- Brake drums are stamped with a discard dimension. This is the allowable wear dimension and not the allowable machining dimension. There must be 0.030 inch (0.762 mm) left for wear after turning the drums. Some states have laws about measuring the limits of a brake drum.
- Machining or grinding brake drums increases the inside diameter of the drum and changes the lining-to-drum fit. When remachining a drum, follow the equipment instructions for the specific tool you are using.
Cleaning Newly Refaced Drums
- The friction surface of a newly refaced drum contains millions of tiny metal particles.
- These particles not only remain free on the surface, they always lodge themselves in the open pores of the newly machined surface.
- If the metal particles are allowed to remain in the drum, they become imbedded in the brake lining.
- Once the brake lining gets contaminated in this manner, it acts as a fine grinding stone and scores the drum.
- These metal particles must be removed by washing or cleaning the drum. Do not blow out the drum with air pressure.
- Either of the following methods is recommended to clean a newly refaced brake drum.
- The first method involves washing the brake drum thoroughly with hot water and wiping with a lint-free rag. Then, use the air pressure to thoroughly dry it. If the front hub and drums are being cleaned, be very careful to avoid contaminating the wheel bearing grease. Or, completely remove all the old grease, then regrease and repack the wheel bearing after the drum has been cleaned and dried. The wheel bearings and the grease seals must be removed from the drum before cleaning.
- The second method involves wiping the inside of the brake drum (especially the newly machined surface) with a lint-free white cloth dipped in one of the many available brake cleaning solvents that do not leave a residue. This operation should be repeated until dirt is no longer apparent on the wiping cloth. Allow the drum to dry before reinstalling it on the vehicle.
Mechanical Component Service of Duo-Servo Drum Brakes
- Disconnect the cable from the parking brake lever.
- If required, install wheel cylinder clamps on the wheel cylinders to prevent fluid leakage or air from getting into the system while the shoes are removed. Some brakes have wheel cylinder stops; therefore, wheel cylinder clamps are not required. Regardless of whether or not the clamps are needed, do not press down on the brake pedal after shoe return springs have been removed. To prevent this, block up the brake pedal so it cannot be depressed.
- Remove the brake shoe return springs. Use a brake spring removal and installation tool to unhook the springs from the anchor pin or anchor plate.
- Remove the shoe retaining or hold-down cups and springs. Special tools are available, but the hold-down springs can be removed by using pliers to compress the spring and rotating the cup with relation to the pin.
- Self-adjuster parts can now be removed. Lift off the actuating link, lever and pivot assembly, sleeve (through lever), and return spring. No advantage is gained by disassembling the lever and pivot assembly unless one of the parts is damaged.
- Spread the shoes slightly to free the parking brake strut and remove the strut with its spring. Disconnect the parking brake lever from the secondary shoe. It can be attached with a retaining clip, bolt, or simply hooked into the shoe.
- Slip the anchor plate off the pin. No advantage is gained by removing the plate if it is bolted on or riveted. Spread the anchor ends of the shoes and disengage them from the wheel cylinder links, if used. Remove the shoes connected at the bottom by the adjusting screw and spring, as an assembly.
- Overlap the anchor end of the shoes to relieve spring tension. Unhook the adjusting screw spring, and remove the adjusting screw assembly.
CAUTION
Keep the adjusting screws and automatic adjuster parts for left and right brakes separate. These parts usually are different. For example, on some automatic adjusters, the adjusting screws on the right brakes have left-hand threads and the adjusting screws on the left brakes have right-hand threads.
Keep the adjusting screws and automatic adjuster parts for left and right brakes separate. These parts usually are different. For example, on some automatic adjusters, the adjusting screws on the right brakes have left-hand threads and the adjusting screws on the left brakes have right-hand threads.
Disassembling Nonservo or Leading-Trailing Brakes
- Install the wheel cylinder clamp. Then unhook the adjuster spring from the parking brake strut and reverse shoe.
- Unhook the upper shoe-to-shoe spring from the shoes and unhook the antinoise spring from the spring bracket.
- Remove the parking brake strut and disengage the shoe webs from the flat, clamp shoe hold-down clips.
- Unhook the lower shoe-to-shoe spring and remove the forward shoe. Disconnect the parking brake cable, then remove the reserve shoe.
- Remove the shoe hold-down clips from the backing plate.
- Press off the C-shaped retainers from the pins and remove the parking brake lever, automatic adjuster lever, and adjuster latch.
- Remove the parking brake lever.
Mark the shoe positions if shoes and linings are to be reused. When disassembling an unfamiliar brake assembly, work on one wheel at a time and use the other wheel as a reference.Do not use ordinary grease to lubricate drum brake parts. It does not hold up under high temperatures.
This details will help.
Thanks.
See below latest car help solutions :----

it is a Brake oil here from it o be here for it
ReplyDelete