
How to replace CV joints.
CV joint replacement kit. Inspect and replace CV joints.
CV Joint & Boot Kit Operation:
Kit used to rebuild worn or damaged CV joints. The kit usually includes boot and boot straps, special extreme pressure grease and new joint components, such as snap rings, rollers, needle bearings and spider joints or housing.
See below the CV joint Kit


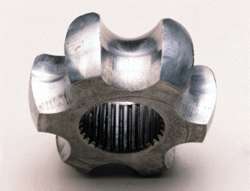 A worn cage or race can cause a clicking sound during a turn. Courtesy of Moog Automotive, Inc.
 Inspection points for a FWD vehicle.
See below latest solved car problems list :---
CV joint replacement kit. Inspect and replace CV joints.
CV Joint & Boot Kit Operation:
Kit used to rebuild worn or damaged CV joints. The kit usually includes boot and boot straps, special extreme pressure grease and new joint components, such as snap rings, rollers, needle bearings and spider joints or housing.
See below the CV joint Kit
Any noise in the engine, drive axle, steering, or suspension is a good reason for a thorough inspection of the vehicle. A road test on a smooth surface is a good place to begin. The test should include driving at average highway speeds, some sharp turns, acceleration, and coasting. Look and listen for the following signs:
- A popping or clicking noise when turning indicates a possible worn or damaged outer joint.
- To help identify the exact cause, put the vehicle in reverse and back up in a circle. If the noise gets louder, the outer joints should be replaced.
- A clunk during accelerating, decelerating, or putting an automatic transaxle into drive can be caused by excessive play in the inner joint on FWD vehicles. A clunking noise when putting an automatic transmission into gear or when starting out from a stop usually indicates excessive play in an inner or outer joint. Be warned, though, that the same kind of noise can also be produced by excessive backlash in the differential gears and transmission. Alternately accelerating and decelerating in reverse while driving straight can reveal worn inner plunge joints. A bad joint clunks or shudders.
- A humming or growling noise is sometimes due to inadequate lubrication of either the inner or outer CV joint. It is more often due to worn or damaged wheel bearings, a bad intermediate shaft bearing on equal-length half shaft transaxles, or worn shaft bearings within the transmission.
- A shudder or vibration when accelerating is often caused by excessive play in either the inboard or outboard joint but more likely it is the inboard plunge joint. These vibrations can also be caused by a bad intermediate shaft bearing on transaxles with equal-length half shafts. On FWD vehicles with transverse-mounted engines, this kind of vibration can also be caused by loose or deteriorated engine/transaxle mounts. Be sure to inspect the rubber bushings in the engine's upper torque strap to rule out this possibility. A vibration or shudder that increases with speed or comes and goes at a certain speed may be the result of excessive play in an inner or outer joint. A bent axle shaft can cause the same problem. Note, however, that some shudder could also be inherent to the vehicle.
- A cyclic vibration that comes and goes between 45 and 60 mph (72 and 100 km) may lead the technician to think there is a wheel that is out of balance. However, as a rule, an out-of-balance wheel produces a continuous vibration. A more likely cause is a bad inner tripod CV joint. The vibration occurs because one of the three roller tracks has become dimpled or rough. Every time the tripod roller on the bad track hits the rough spot, it creates a little jerk in the driveline, which the driver feels as a cyclic vibration.
- If a noise is heard while driving straight ahead but it ceases while turning, the problem is usually not a defective outer CV joint but a bad front wheel bearing. Turning changes the side load on the bearing, which may make it quieter than before.
- A vibration that increases with speed is rarely due to CV joint problems or FWD half shaft imbalance. An out-of-balance tire or wheel, an out-of-round tire or wheel, or a bent rim are the most likely causes. It is possible that a bent half shaft, as the result of collision or towing damage, could cause the vibration. A missing damper weight could also be the culprit.
Begin CV joint inspection by checking the condition of the boots.
Splits, cracks, tears, punctures, or thin spots caused by rubbing call for immediate boot replacement. If the boot appears rotted, this indicates improper greasing or excessive heat, and it should be replaced. Squeeze all boots. If any air escapes, replace the boot.
If the inner boot appears to be collapsed or deformed, venting it (allowing air to enter) might solve the problem. Place a round-tipped rod between the boot and drive shaft. This equalizes the outside and inside air and allows the boot to return to its normal shape.
Make sure that all boot clamps are tight. Missing or loose clamps should be replaced. If the boot appears loose, slide it back and inspect the grease inside for possible contamination. A milky or foamy appearance indicates water contamination. A gritty feeling when rubbed between the fingers indicates dirt. In most cases, a water- or dirt-contaminated joint should be replaced.
The drive axles should be checked for signs of contact or rubbing against the chassis. Rubbing can be a symptom of a weak or broken spring or engine mount, as well as chassis misalignment. On front-wheel-drive transaxles with equal-length half shafts, inspect the intermediate shaft U-joint, bearing, and support bracket for looseness by rocking the wheel back and forth and watching for any movement. Oil leakage around the inner CV joints indicates a faulty transaxle shaft seal. To replace the seal, the half shaft must be removed.
This will help.
Thanks.
See below latest solved car problems list :---
- How to replace Blower motor on 1993 Buick Regal?
- How to replace blower motor on Chevrolet Beretta?...
- How to remove instrument panel on Chevrolet car?
- How to replace blower motor on 1990 Honda Accord?
- Nissan Sentra stuck in park?
- 2002 nissan sentra will not go out of park mode?
- Key Fob will not lock and unlock doors?
- KeyFob will open the doors but not start on BMW?
- Volkswagen Routan Fog Lamp Acivation code?
- Key wont turn in the ignition on Toyota land cruis...
- Dodge manual transmission will not go in reverse g...
- Dodge Automatic transmission will not go into reve...
- Dodge neon wont go in reverse?
- how to replace power steering pressure hose on mu...
- How to replace Adjustable Camshaft timing solenoid...
- B2 on Mercedes Benz?
- Heater quits heating after few minutes on Ford?
- Hummers headlights flashes while start?
- 2009 Chevy impala accelerator pedal sensor?
- How to replace rear brake pads on 2002 Lincoln con...
- steering service light came on 2004 Pontiac Grand ...
- Steering service light ON GMC Sierra Denali?
- Ford Windstar transmission fluid leaking?
- Ford Mondeo ST220 camshaft Timing specifications?
- Radio Power Antenna wiring diagram for 1992 Lincol...
- Stereo goes to Phone mode on Lincoln Town car?
- How to replace Rear Timing Belt Cover on Dodge Neo...
- How to replace Timing Belt Cover on Dodge Neon?
- How to replace Timing Belt and Tensioner on 2001 D...
- How to replace Timing Belt & Sprockets on 2001 Dod...
- How to replace timing belt on 2001 Dodge neon?
- Headlight wiring diagram for 1997 Lincoln Town Car...
- Lincoln Town Car Radio stereo wiring?
- Radio wiring diagram for 1997 Lincoln Town Car?
- How to replace fuel filter on 2000 holden VT Commo...
- Where is glow plug module located on 2005 Ford f35...
- Samsung Galaxy Vibrate activate?
- LG Slide Handset & Mobile LG GU 0220 Problem?
- Tv does not recognize the remote?
- Unable to make calls or send sms messages via blac...
- NP Code for mobile phone?
- What wire to connect to hook up trailer on Nissan...
- 1997 Nissan Sentra Tail light wiring diagram?
- Charging system problem on Chrysler LHS car?
- 1996 Chrysler LHS brake light circuit wiring diagr...
- Rear Tail light wiring diagram for 2000 Isuzu Rode...
- Cooling fan relays location on 1998 ford mustang?
- Loss of acceleration?
- Steering wheel problem on car?
- Ford Fuel pump Relay and fuse location diagram?
- Ford fuel pump fuse layout diagram?
- Ford inside fuse box diagram showing fuel pump rel...
- Airbag and srs light off on Mercedes ml 270?
- How i solved SRS and AIRBAG OFF light problem on M...
- where is power window fuse located on 2000 ford wi...
- Engine accelerates when brake is applied?
- How to replace heater core on Mitsubishi eclipse?
- How to replace heater core on Mitsubishi magna?
- dodge neon gauges not working?
- high rpm in neutral? Inconsistant high RPM in neu...
- Engine miss and truck jumps? Hard to down shift? I...
- Car running hot?
- Squeak and grinding sound is heard when brakes ar...
- idle flair is noticed on car? Rough idle? car will...
- 2002 Ford Focus sits over night and battery goes ...
- 1998 Ford F150 pickup Battery Drains overnight due...
- Pushing on the gas pedal, but the car slows down? ...
- Oil on spark plugs and car misfires?
- Where is blower motor relay located on 2005 Ford F...
- How to remove SRS airbag on honda odyssey?
- Timing belt diagram,replacing,valve clearance timi...
- Valve Lash Clearance Adjustment for 2005 Toyota La...
- Timing Belt, Cover, Sprockets, & Seal replacing fo...
- How to replace Timing belt on 2005 Toyota Land Cru...
- How to remove door panel on Hummer H3X?
- Chevy Silverado 2500 HD steering wheel replacing P...
- How to replace Tie Rod Ends on Chevy silverado 250...
- How to replace steering linkage on Chevrolet Silve...
- How to Replace power steering pump on Chevy silver...
- Power Recirculating Ball Steering Gear removal on ...
- How to replace Power steering rack and pinion gear...
- Chevy equinox quits heat after few minutes?
- Mitsubishi Lancer rpm needle bounces?
- 1983 ford f350 tow truck owners manual?
- Nissan Pathfinder Backfires?
- Nissan Pathfinder stalls and bucks on Acceleration...
- A/C, heater, defroster fan, not working?
- Heater AC or defroster fan not working on KIA?
- Temperature gauge stays At cold on jaguar?
- service engine soon light is ON?
- Ford explorer 4.0 will not idle when cold?
- Ford Ranger Battery light stays steady ON?
- Ford runs lean and idles rough?
- 1994 ford E150 Timing problem?

No comments:
Post a Comment