@

Tuesday, March 26, 2013

2005 Cadillac DeVille driver's side door will no longer open from the inside

Door Will Not Get Open From Inside

Most probably the inside door Handel holding assembly is got bit loose or the door Handel is broken and needs replacement.
The door Handel assembly easily available at local auto part store or at dealer.

It costs approx $30 to $ 50.The rate depens on quality and store.

What's Inside The Door Panel Assembly

You'll need to remove screws that are by the door handle, arm rest, under door and side of door and then gently pull back on the panel as there will also be retaining clips attached and you don't want to break them.

You'll need to lift the door panel upwards in order to get it off the window ledge.

If needed, you can pull back the weather seal (can't reuse it, but it's not that important) and you will be able to access everything inside the door.


If the Door Is Not Getting Open and To Manually Open the Door From Inside


You need  remove the cover that is behind the inside door handle and  you will see the arm that connects to the handle.
Inspect this arm carefully, if its connected then you will have to remove the inner door panel,if its come off the handle and you get a hold of it you can pull on it and the door should open.

Please dont apply force,you have to be patient to remove the door panel with the door closed.
You will need to remove some screws to loosen the panel from the steel door inner panel.(arm rest,cover behind the handle).
Once this is done pop up the power door/window switch control and remove the plug attached.
Pull out the inner door panel to unhook the clips around the outside edge of the panel,you will have to move the seat to get better access to some,then remove the panel and reach into the inner door and move the unlock arm to open the door.
You may have clips that are broken that allowed the arms to come off that need replacing to fix the problem.
The clips are made up of plastic and easily available at Auto parts store.


ALSO view the condition of door handel,is the cable that holds the handel from inside got loose.

The inside handle is broken and not pulling the cable. When you replace it you will need either a commercial rivet gun and large rivets (like the factory used):
door Handel fittings
Or replace the rivets with a nut & bolt. If you use the nut & bolt I would use some blur Lock-Tite.


Basically there are two types of door handel used.

See the image shown below:
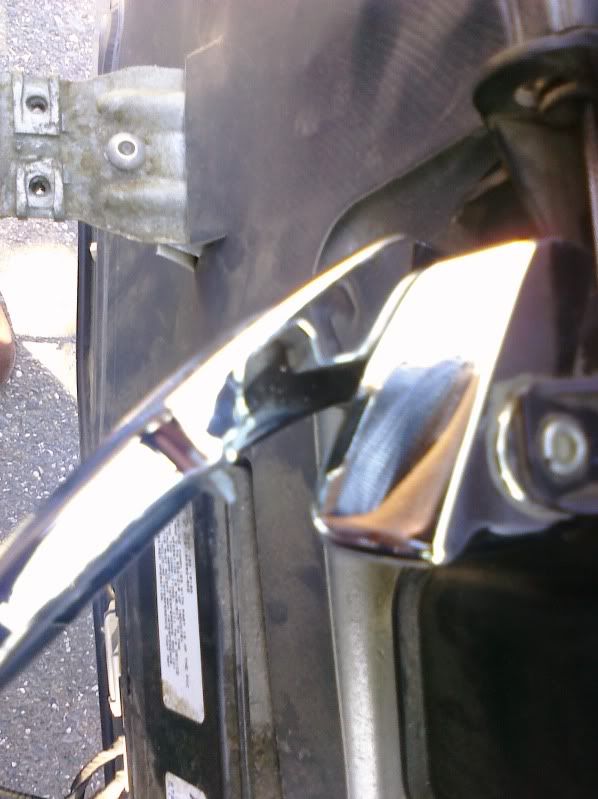
door handel replacement

The first one is missing a piece of plastic on the handle right were the lock latch is.
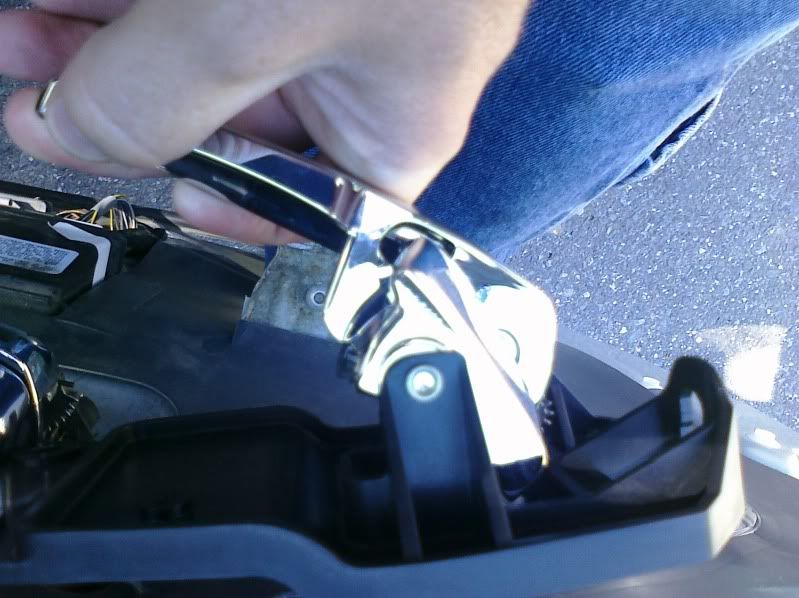
Cadillac deville driverside door Handel.


If the door lock changes position while the door is closed, the interior door handle will open the door only once, and then the door will not latch nor will the handle operate the mechanism UNTIL you lock and unlock the door, which can take several times pressing lock and unlock until it unjams itself.


If the door latch is not completely unlocked, it won't latch when you close the door.

You can test this by holding the lock knob down a bit, and try closing the door.

The repair on such cases needs a new lock actuator, it will not unlock fully because the rubber boot is gone, and it corroded the solenoid.


This details will help.
Thanks.


ALSO VIEW THIS RELATED:

For Car parts and diagrams:

CAR MANUAL GUIDE
                 
FOR FREE MANUALS AND GUIDES: ---
Car repair guide?


For all types of car repair help:


Car Backfires

For car repair How to guides:


OVERHEATING: Radiator Fan Not Working

Engine Cooling Fan not Working


"Radiator fan"  "Engine Fan"  "COOLING FAN WILL NOT TURN OFF"

LIFT GATE / TAIL GATE ISSUES

TRUNK WILL NOT OPEN


CAR ALARM ISSUES


Car starter removal, Starter motor testing, Starter repairs, Starter solenoid, Starter wiring,


DOOR PANEL REMOVAL, car door panel, door panel components, front door panel, rear door panel,


HEATER CORE REPLACEMENT, HEATER CORE REMOVAL, TROUBLESHOOT HEATER CORE, FLUSH HEATER CORE,

CAR POWER SEAT, ELECTRIC SEAT, POWER SEAT WILL NOT WORK, SEAT WILL NOT GO FORWARD,


For all types of---------

Timing belt routing diagrams for cars and trucks?


==========

For all types of --------

Drive belt routing diagrams for cars and trucks?


stalling issues:
Engine stalls, car stalls while starting, vehicle stalls while starting, Engine stalls and dies, Car stalls and stops,


CRUISE CONTROL Not working, cruise control replacing, troubleshooting cruise control problems,


TRANSMISSION PROBLEMS:

NO REVERSE ON TRANSMISSION

GEAR SHIFT ISSUES

Transmission fluid leak, transmission gears slip,


TRANSMISSION REPLACING AND TROUBLESHOOTING, INSPECTING TRANSMISSION COMPONENTS, TRANSMISSION FAILURES, OD WARNING LIGHT,


TRANSMISSION FLUID FILLING, WHERE TO FILL TRANSMISSION FLUID, AUTOMATIC TRANSMISSION FLUID, NO TRANSMISSION DIPSTICK,


WINDSHIELD WIPERS, WINDSHIELD WIPERS NOT WORKING,WIPER MOTOR MAKING NOISE,NO WIPERS,WIPER FLUID LEAKS,WIPER FUSE AND RELAY,


COOLANT LEAK ISSUES, COOLANT LEAK PROBLEMS, COOLANT SENSOR, LOW COOLANT,


BRAKE LIGHTS NOT WORKING, REPAIRING BRAKE LIGHTS, NO BRAKE LIGHTS,


CHECK ENGINE LIGHT,ENGINE WARNING LIGHT FLASHING,ENGINE LIGHT ON DASH,DASHBOARD WARNING LIGHT,ECM ERROR CODES,


DASHBOARD WARNING LIGHTS ARE ON, ENGINE LIGHT ON DASH,WARNING LIGHTS STEADY ON DASH,RESET DASH BOARD WARNING INDICATOR,


KEYFOB PROGRAMMING, REPROGRAMMING CAR KEY, KEYLESS ENTRY RESET,ANTITHEFT WILL NOT LET CAR TO START, ANTI THEFT ISSUES, KEYFOB NOT WORKING, KEYLESS ENTRY QUIT WORKING,


IGNITION KEY WILL NOT RELEASE, IGNITION KEY STUCK UP, KEY WILL NOT COME OUT OF IGNITION, FAULTY IGNITION KEY LOCK CYLINDER, REPLACING IGNITION CYLINDER,


HEATER ISSUES:

HEATER NOT BLOWING COLD,NO HOT AIR FROM HEATER,A/C BLOWS HOT AIR,A/C NOT BLOWING COLD, COLD AIR FROM HEATER,BLEND DOOR ACUTATOR CLOSED,HVAC UNIT NOT OPERATING,


HEATER NOT BLOWING COLD,NO HOT AIR FROM HEATER,A/C BLOWS HOT AIR,A/C NOT BLOWING COLD, COLD AIR FROM HEATER,BLEND DOOR ACUTATOR CLOSED,HVAC UNIT NOT OPERATING,


STEERING ISSUES:

POWER STEERING TROUBLESHOOTING, STEERING SQUEAKS, POWER STEERING FLUID LEAKS, FAULTY POWER STEERING PUMP, POWER STEERING NOT WORKING, POWER STEERING BELT,


VEHICLE STARTING ISSUE:

CAR NO START: ENGINE NOT TURNING OVER:

How to Replace 2008 Mazda 2.3L Timing Chain?

2008 Mazda 6 2.3L use a timing chain.

Timing chain ( on the 2.3 liter 4 cylinder and the 3.0 liter V6 ).

It seems that the Timing Chain Tensioner in this car has the tendency to fail.

The exact problem can be described as a rattling/ticking sound coming from the left corner of the valve cover (where the chain is.) It get more audible as the car is warmed up.You can hear it in the cabin at idol pretty easily.

It requires three special tools from Mazda according to ALLDATA.

I have built a fair amount of these motors and the biggest pain is getting a good angle on the front cover which is between the passenger side tire and the motor. You do have to take off a few covers and belts for good access and its not the easiest thing -


Timing chains dont need special tools to change out.

Is the spring failing or the plastic piece that contacts the chain?

Here is the common procedure to replace Timing Chain for Mazda 6 2.3L engine model:----


TIMING CHAIN REMOVAL/INSTALLATION L3

Please Don't Ignore the Warning Note:
Fuel vapor is hazardous. It can very easily ignite, causing serious Injury and damage. Always keep sparks and flames away from fuel.
Fuel line spills and leakage are dangerous. Fuel can ignite and cause serious injuries or death and damage. Fuel can also irritate skin and eyes.

TIMING CHAIN REMOVAL STARTS:
Disconnect the negative battery cable.
Remove the plug hole plate.
Remove the spark plugs.
Remove the tire (RH).
Remove the under cover.
Loosen the water pump pulley bolt and remove the drive belt.
Remove the Crankshaft Position (CKP) sensor.
Drain the engine oil.
Remove the P/S oil pump with the oil hose still connected and position the P/S oil pump so that it is out of the way.
Remove the front drive shaft (RH) from the joint shaft.


Remove in the order indicated in the table above.
Install in the reverse order of removal.
Start the engine and:
Inspect for the engine oil, engine coolant, transaxle oil and fuel leakage.
Verify the ignition timing, idle speed and idle mixture.
Perform a road test. Crankshaft Pulley Lock Bolt Removal Note
Remove the cylinder block lower blind plug.
Install the SST.


View the Timing chain Disassembly diagram shown below:---

Timing Chain replacing


mazda timing chain


Note down the marks properly while disassembly. Is there any marks on the camshafts that would indicate where they should be when reinstalling to line up with the crankshaft.

To adjust the timing chain.Rotate the crankshaft clockwise until the crankshaft is in the No.1 cylinder TDC position (until the balance weight is contacting the SST).

timing chain tensioner adjustment


Hold the crankshaft pulley using the SSTs. Chain Tensioner Removal Note

Hold the chain tensioner ratchet lock mechanism away from the ratchet stem using a thin screwdriver.
Slowly compress the tensioner piston.
Hold the tensioner piston using a 1.5 mm (0.059 in) wire or paper clip.


ALSO VIEW THIS RELATED:

For Car parts and diagrams:

CAR MANUAL GUIDE
                 
FOR FREE MANUALS AND GUIDES: ---
Car repair guide?


For all types of car repair help:


Car Backfires

For car repair How to guides:


OVERHEATING: Radiator Fan Not Working

Engine Cooling Fan not Working


"Radiator fan"  "Engine Fan"  "COOLING FAN WILL NOT TURN OFF"

LIFT GATE / TAIL GATE ISSUES

TRUNK WILL NOT OPEN


CAR ALARM ISSUES


Car starter removal, Starter motor testing, Starter repairs, Starter solenoid, Starter wiring,


DOOR PANEL REMOVAL, car door panel, door panel components, front door panel, rear door panel,


HEATER CORE REPLACEMENT, HEATER CORE REMOVAL, TROUBLESHOOT HEATER CORE, FLUSH HEATER CORE,

CAR POWER SEAT, ELECTRIC SEAT, POWER SEAT WILL NOT WORK, SEAT WILL NOT GO FORWARD,


For all types of---------

Timing belt routing diagrams for cars and trucks?


==========

For all types of --------

Drive belt routing diagrams for cars and trucks?


stalling issues:
Engine stalls, car stalls while starting, vehicle stalls while starting, Engine stalls and dies, Car stalls and stops,


CRUISE CONTROL Not working, cruise control replacing, troubleshooting cruise control problems,


TRANSMISSION PROBLEMS:

NO REVERSE ON TRANSMISSION

GEAR SHIFT ISSUES

Transmission fluid leak, transmission gears slip,


TRANSMISSION REPLACING AND TROUBLESHOOTING, INSPECTING TRANSMISSION COMPONENTS, TRANSMISSION FAILURES, OD WARNING LIGHT,


TRANSMISSION FLUID FILLING, WHERE TO FILL TRANSMISSION FLUID, AUTOMATIC TRANSMISSION FLUID, NO TRANSMISSION DIPSTICK,


WINDSHIELD WIPERS, WINDSHIELD WIPERS NOT WORKING,WIPER MOTOR MAKING NOISE,NO WIPERS,WIPER FLUID LEAKS,WIPER FUSE AND RELAY,


COOLANT LEAK ISSUES, COOLANT LEAK PROBLEMS, COOLANT SENSOR, LOW COOLANT,


BRAKE LIGHTS NOT WORKING, REPAIRING BRAKE LIGHTS, NO BRAKE LIGHTS,


CHECK ENGINE LIGHT,ENGINE WARNING LIGHT FLASHING,ENGINE LIGHT ON DASH,DASHBOARD WARNING LIGHT,ECM ERROR CODES,


DASHBOARD WARNING LIGHTS ARE ON, ENGINE LIGHT ON DASH,WARNING LIGHTS STEADY ON DASH,RESET DASH BOARD WARNING INDICATOR,


KEYFOB PROGRAMMING, REPROGRAMMING CAR KEY, KEYLESS ENTRY RESET,ANTITHEFT WILL NOT LET CAR TO START, ANTI THEFT ISSUES, KEYFOB NOT WORKING, KEYLESS ENTRY QUIT WORKING,


IGNITION KEY WILL NOT RELEASE, IGNITION KEY STUCK UP, KEY WILL NOT COME OUT OF IGNITION, FAULTY IGNITION KEY LOCK CYLINDER, REPLACING IGNITION CYLINDER,


HEATER ISSUES:

HEATER NOT BLOWING COLD,NO HOT AIR FROM HEATER,A/C BLOWS HOT AIR,A/C NOT BLOWING COLD, COLD AIR FROM HEATER,BLEND DOOR ACUTATOR CLOSED,HVAC UNIT NOT OPERATING,


HEATER NOT BLOWING COLD,NO HOT AIR FROM HEATER,A/C BLOWS HOT AIR,A/C NOT BLOWING COLD, COLD AIR FROM HEATER,BLEND DOOR ACUTATOR CLOSED,HVAC UNIT NOT OPERATING,


STEERING ISSUES:

POWER STEERING TROUBLESHOOTING, STEERING SQUEAKS, POWER STEERING FLUID LEAKS, FAULTY POWER STEERING PUMP, POWER STEERING NOT WORKING, POWER STEERING BELT,


VEHICLE STARTING ISSUE:

CAR NO START: ENGINE NOT TURNING OVER:

Tuesday, March 12, 2013

Dakota Truck: "Idles up and down"

Engine idles up and down


It feels like giving gas and letting it off.
Also it feels like car not taking gas while driving.

"RPM goes UP and Down"

It's very likely that the truck thinks you are actually accelerating and letting off when you aren't.

The RPM fluctuation symptoms , rpm up and down you have described are usually caused by an erratic signal from the throttle position sensor (TPS). The tps throttle position sensor is mounted on the left side of the throttle body and tells the powertrain control module (PCM) how far the throttle is open.

Throttle position sensor location:

The left side of the vehicle is the left side if you were sitting in it. Assuming you are in the US the left side of the truck is the driver's side. We want the throttle position sensor.

tps
dodge throttle position sensor


It sounds like you are having two common symptoms that happen with an erratic TPS signal. When the sensor gets worn it will start to create small voltage spikes in it's signal. The PCM will see these voltage increases and think you are opening the throttle when you actually aren't. When this happens at idle it will cause the idle to go up and down because it thinks you are opening and closing the throttle.

When you're driving at a steady speed the torque converter clutch will lock up and give a mechanical lock between the engine and trans, this drops engine RPM and slightly raises fuel mileage. When it sees the voltage increases from the TPS while the converter clutch is on it thinks you are starting to accelerate to either speed up or pass, so it unlocks the torque converter. This will cause the RPM's to jump up and then settle back down as the voltage drops back to normal.

The TPS is held on with two Torx screws and is easy to replace.

The acceleration problem could be related to the TPS. If your "check engine light" has come on I would recommend first seeing what obd codes are set, which you can do with a built in feature or by using a scan tool or code reader. Most large autoparts stores like Autozone will read fault codes for free. If there are performance related codes set then they should be diagnosed and repaired and hopefully that will take care of the acceleration issue.

It sounds like you may be experiencing a hesitation from a bad upstream oxygen sensor, which threads into the exhaust before the converter. If the acceleration problem is happening during warm up or operation in colder weather it may be happening because of a weak oxygen sensor heater. If the built in heater doesn't bring the sensor to operating temperature and keep it there it can cause a very lean fuel mixture, hesitation, and sometimes some backfiring on acceleration.

Upstream Oxygen Sensor Location

Dodge Upstream Oxygen Sensor Location

This will help.
Thanks.


"Chrysler PT Cruiser":Check Engine Code "P0340"

Engine codes trouble code P0340

While accelerating accelerate normally "engine sputter", hesitating picking up speed.

"Auto Repair" mechanic scanned the vehicle with OBD ii tool and retrieve Engine error codes P0340


There is simple procedure to retrieve error codes with out Obd ii software.
I will mention that procedure here:

Follow the procedure mentioned below:

With the doors closed cycle the key from off to on three times ending with it on and watch the digital odometer display. Don't crank the starter, just off to on. The codes start with a P and have four numbers, there may be more than one stored. Write down and go through the manual for the error codes.

Here we will discuss about OBD code P0340


P0340  "obd codes" sets when the engine controller doesn't see a signal from the camshaft position sensor.

"Where is the camshaft position sensor"  "What is camshaft position sensor"

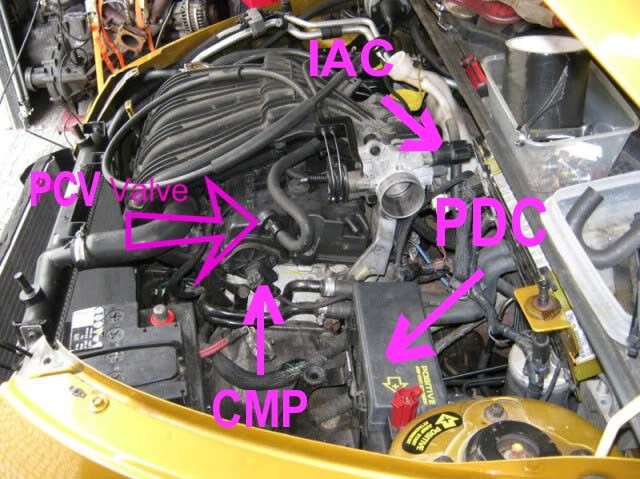
The cam sensor is on the left end of the cylinder head and is mounted with two 8mm bolts.
Cam sensor is the sensing device which reads off a magnet on the end of the intake cam and reports the cam's position and speed.

Cam sensor shown as CMP
cam sensor


camshaft position sensor code can be set by improper cam timing, wiring, the magnet in rare cases, or a failure of the sensor itself. At least 99% of the time this is just a failed cam sensor, which is common on these engines.

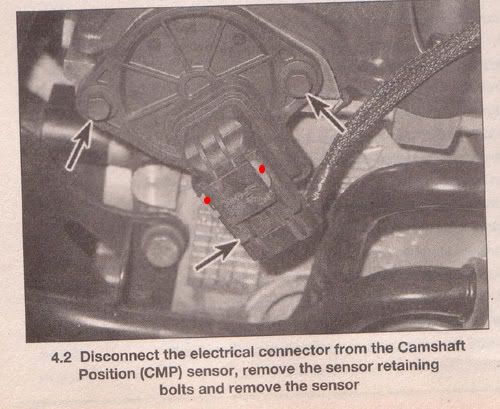
I  recommend taking a look at the "camshaft position sensor" connection and wiring in the immediate area, if all looks ok then replace the sensor. It's not hard to replace yourself if you normally do some minor repairs. You just have to unplug it and remove the two bolts.

Its suggested only using a Mopar replacement sensor. Aftermarket sensors have shown extremely poor quality and you usually end up with at least the same problem if not more problems with the new sensor. They sometimes cause the same code to immediately reset, new codes to appear, or even a no start condition.

The reason it takes alot of cranking to start it is because the cam signal gets missing. The software in the vehicles NGC engine controller actually allows the engine to start if it sees the cam signal is missing, but it starts with an extended crank time.

The hesitation felt is also because of the missing cam signal. When it sees the signal is missing it will impose a 2,500 RPM rev limiter. When you are accelerating and try to exceed 2,500 RPM it will cut fuel and spark back to limit engine RPM.

camshaft position sensor replacement
The camshaft sensor cost about $61 from a dealer or you can pick one up from an online Mopar parts source such as www.moparonlineparts.com for a bit cheaper. That site sells the same Mopar sensor for $45.

To removal and install new cam sensor:

Chrysler cam sensor


This will help.
Thanks.


Sunday, March 10, 2013

Can't get oil cap off


Problem with: Cars & Trucks

If the oil cap is too tight.
A pry bar can work wonders.

On one of such similar case at our car garage

Our garage technician  traced the problem to shrinkage of the valve cover. It is made of fiber filled thermoplastic and is not dimensional  stable - it shrinks so much so that it seizes the oil fill cap. This cap is a quarter turn and then lift up to remove. It has an O-ring seal. Once the cap becomes tight in the hole, it is very difficult to tell when the cap has turned to it stop for lifting out. And due to this it does not lift out as intended.

The oil filler caps are known for doing this. The ratchet inside the cap breaks. You need to pry the top of the cap off with a large screwdriver and then get a pair of pliers or vise grips on the part that is still in there to free it.
If its very difficult to open by hand
Get two spanners about the same size as the width of the cap handle and pop one on each side of the cap and lever/unscrew it open
Or you can use adjustable pipe wrench.


ALSO VIEW THIS RELATED:

CAR MANUAL GUIDE
                 
FOR FREE MANUALS AND GUIDES: ---
Car repair guide?


Car Backfires


OVERHEATING: Radiator Fan Not Working

Engine Cooling Fan not Working


"Radiator fan"  "Engine Fan"  "COOLING FAN WILL NOT TURN OFF"


LIFT GATE / TAIL GATE ISSUES


TRUNK WILL NOT OPEN


CAR ALARM ISSUES


Car starter removal, Starter motor testing, Starter repairs, Starter solenoid, Starter wiring,


DOOR PANEL REMOVAL, car door panel, door panel components, front door panel, rear door panel,


HEATER CORE REPLACEMENT, HEATER CORE REMOVAL, TROUBLESHOOT HEATER CORE, FLUSH HEATER CORE,


CAR POWER SEAT, ELECTRIC SEAT, POWER SEAT WILL NOT WORK, SEAT WILL NOT GO FORWARD,


For all types of---------

Timing belt routing diagrams for cars and trucks?


==========

For all types of --------

Drive belt routing diagrams for cars and trucks?


stalling issues:
Engine stalls, car stalls while starting, vehicle stalls while starting, Engine stalls and dies, Car stalls and stops,


CRUISE CONTROL Not working, cruise control replacing, troubleshooting cruise control problems,


TRANSMISSION PROBLEMS:

NO REVERSE ON TRANSMISSION

GEAR SHIFT ISSUES

Transmission fluid leak, transmission gears slip,


TRANSMISSION REPLACING AND TROUBLESHOOTING, INSPECTING TRANSMISSION COMPONENTS, TRANSMISSION FAILURES, OD WARNING LIGHT,


TRANSMISSION FLUID FILLING, WHERE TO FILL TRANSMISSION FLUID, AUTOMATIC TRANSMISSION FLUID, NO TRANSMISSION DIPSTICK,


WINDSHIELD WIPERS, WINDSHIELD WIPERS NOT WORKING,WIPER MOTOR MAKING NOISE,NO WIPERS,WIPER FLUID LEAKS,WIPER FUSE AND RELAY,


COOLANT LEAK ISSUES, COOLANT LEAK PROBLEMS, COOLANT SENSOR, LOW COOLANT,


BRAKE LIGHTS NOT WORKING, REPAIRING BRAKE LIGHTS, NO BRAKE LIGHTS,


CHECK ENGINE LIGHT,ENGINE WARNING LIGHT FLASHING,ENGINE LIGHT ON DASH,DASHBOARD WARNING LIGHT,ECM ERROR CODES,


DASHBOARD WARNING LIGHTS ARE ON, ENGINE LIGHT ON DASH,WARNING LIGHTS STEADY ON DASH,RESET DASH BOARD WARNING INDICATOR,


KEYFOB PROGRAMMING, REPROGRAMMING CAR KEY, KEYLESS ENTRY RESET,ANTITHEFT WILL NOT LET CAR TO START, ANTI THEFT ISSUES, KEYFOB NOT WORKING, KEYLESS ENTRY QUIT WORKING,


IGNITION KEY WILL NOT RELEASE, IGNITION KEY STUCK UP, KEY WILL NOT COME OUT OF IGNITION, FAULTY IGNITION KEY LOCK CYLINDER, REPLACING IGNITION CYLINDER,


HEATER ISSUES:

HEATER NOT BLOWING COLD,NO HOT AIR FROM HEATER,A/C BLOWS HOT AIR,A/C NOT BLOWING COLD, COLD AIR FROM HEATER,BLEND DOOR ACUTATOR CLOSED,HVAC UNIT NOT OPERATING,


HEATER NOT BLOWING COLD,NO HOT AIR FROM HEATER,A/C BLOWS HOT AIR,A/C NOT BLOWING COLD, COLD AIR FROM HEATER,BLEND DOOR ACUTATOR CLOSED,HVAC UNIT NOT OPERATING,


STEERING ISSUES:

POWER STEERING TROUBLESHOOTING, STEERING SQUEAKS, POWER STEERING FLUID LEAKS, FAULTY POWER STEERING PUMP, POWER STEERING NOT WORKING, POWER STEERING BELT,


VEHICLE STARTING ISSUE:

CAR NO START: ENGINE NOT TURNING OVER:


Rear passenger wheel is turning in

The passenger rear tire seems to be locking up and skidding across the ground, and then it will release and turn with resistance for a short while and then lock up again. It only seems to do so when turning. 

if you fully turn the wheel in either direction, you have to apply about 2500 rpms before it will start to move, 


  • it may be the differential or the spider gears slipping or sticking

 the sticking is supposed to happen in 4WD, and because of it being on pavement that is causing the clunk noise and the sticking.


  • check the hand brake cable for being stuck in the applied position.


1.wheel hitting something.
2.brake frozen.
3.wheel bearing worn out.

It's  possible that the differential has locked up, other symptoms, like leaking differential oil with metal shavings in it.

More likely culprits are either a seized up wheel bearing or a severely stuck brake caliper.

Take the wheel off and take a look. Also see if there is any leakage under the differential.

If you smell grease, the bearing is bad. If you smell "burnt clutch", you have a brake issue.

Also inspect emergency brake spring and brake shoe condition.


ford expedition goes forward in reverse neutral and park

2000 Ford Expedition that has the reverse lamps on, whenever you turn the car on, even though it's not in Reverse. It doesn't matter which gear the car is in (Park, Reverse, Neutral), the reverse lamps are on.


The problem could be a short to power in the reverse light wiring or a bad trans range sensor.

Try this unplug the trans range sensor on the trans were the shifter linkage goes to and see if the lights go out if they do you need a trans range sensor.


2000 ford expedition that won,t go in reverse

Just incase you didnt check this,look under the dash at the bottom of the steering column,there is a bracket that bolts on with 2 torque bolts at ( t-25 or t-30) the shift cable connects to that bracket and when it loosens up it wont go into park or if loose enough it may not shift to reverse either.An easy way to tell if its loose is if the shift lever feels loose or real easy to move.Also at the transmission where the shift cable connects there is a plastic holder with groves on it for adjustment,dont try adjusting it but inspect it if its loose or broken,if you try adjusting it then its tough to get it back where it needs to be for all the gears to work with the shift indicator tab,about it not starting,that may have to do with the safety neutral switch on the transmission,but double check the linkage to make sure its really tight before worrying about that switch.

2 torque bolts at (t-25 or t-30) .

Please note on the top of the column there is a notch that goes into a slot right before the two (2) torque bolts...this gear is what prevents the car from going into the parking and prevents the key from being removed at the ignition. The shift lever moves freely...but does not move the cable and gears at the transmission.


This should help.
Thanks.


Thursday, March 7, 2013

Nissan Frontier:Fog Light Bypass

Bypass your fog lights on Nissan frontier so they come on with your parking lights using the factory switch.


so here is a little write up on how to bypass your fog lights so they come on with your parking lights using the factory switch.
first go to auto zone, advanced auto, pep boys, what ever you have locally and find an add-a-circuit(also called a fuse tap. looks like this

but you need one for the MINI fuses)
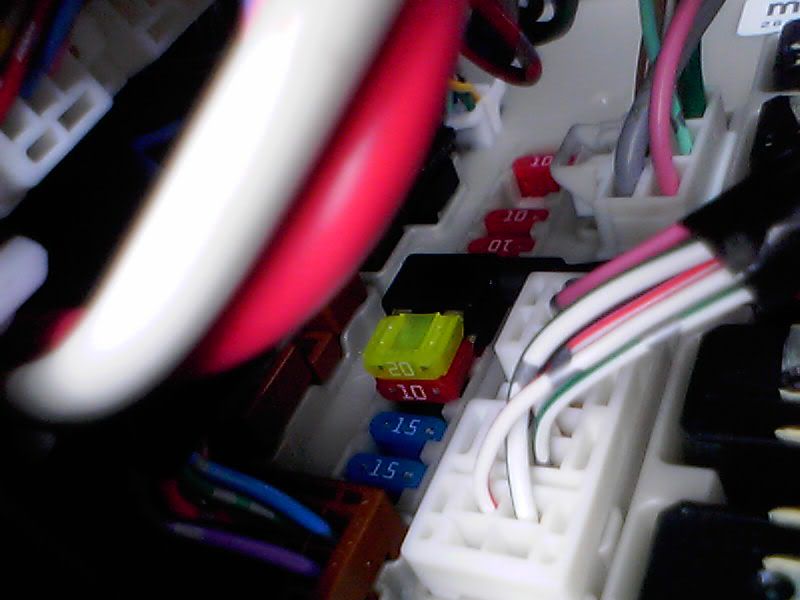
now that you have one remove your under hood fuse panel lid and locate the tail light fuse. this is the fuse you will tap into. also if you want the lights to be able to come on without any other lights you will need to find a different fuse to replace. remove the fuse and put aside.
now cut the connector off the end of the fuse tap as close to the connector as you can. you will need a blade connector and strip a small ammount of wire to hook the blade connector up. you will probably need to grind down the connector some unless you have some very small blade connectors. this can be done with a bench grinder and a pair of needle nose plyers. use a fuse for a guide.
now crimp the connector on the fuse tap and install the tail light fuse in the tap(follow the instructions that came with it). also at this time locate the fog light fuse and remove. install that fuse in the empty slot on the fuse tap.
now install the tap in the tail light fuses spot and connect the blade connector in the "cold" side of the fog light fuse slot. it was the lower of the two.
your fog lights will now come on with the parking lights as well as with the head lights. one note on this, the fogs will stay on EVEN WHEN THE HIGH BEAMS ARE ON. check local laws regarding this.
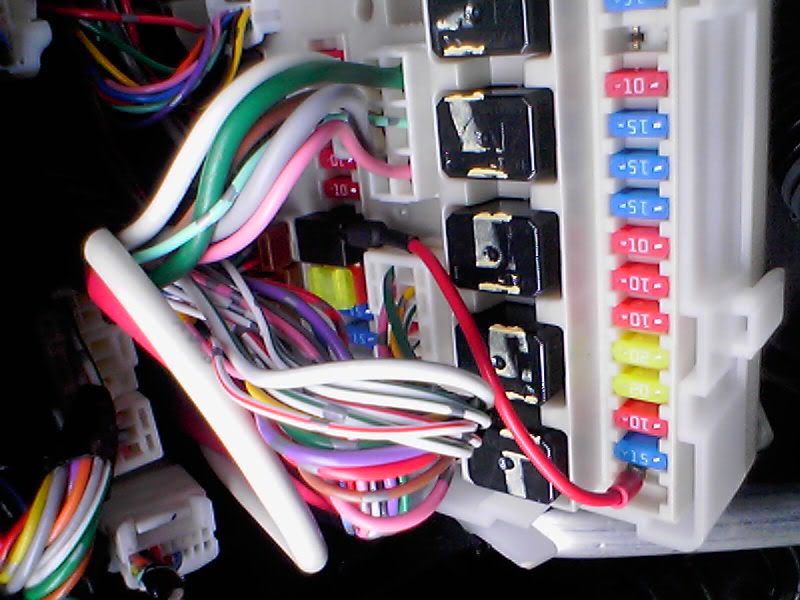
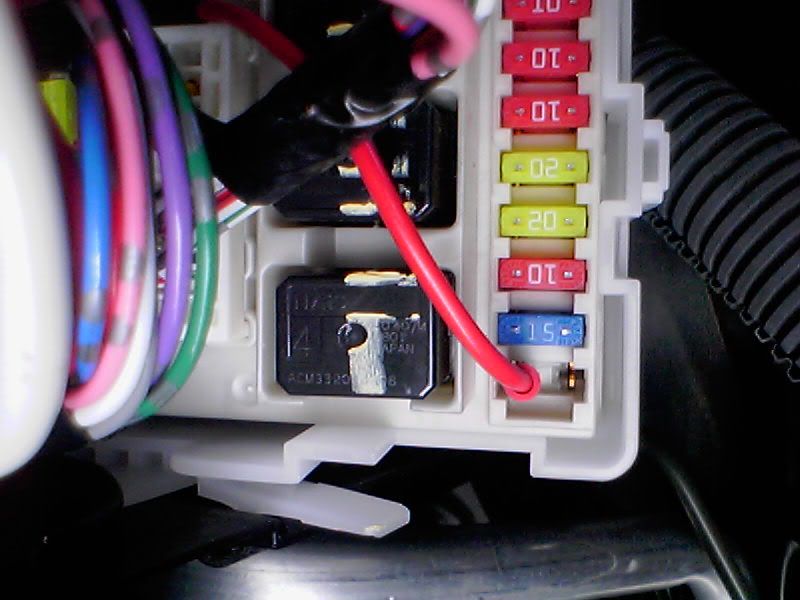
here are some pics of the final setup.

the whole setup.
nissan fuse box


where the fog light fuses was
fuse box diagram

where the tail light fuse was. now where both fuses are.
fuse box


@