Replace crankshaft,crankshaft replacing procedure.
Details and diagrams to replace crankshaft.
Car crankshaft.
Crankshaft Operation:
A revolving part mounted in the lower portion of the engine block.
That part of a reciprocating compressor on which the wobble plate or connecting rods are attached.
 Remove the main bearing caps, then lift the crankshaft from the block. Reprinted with the permission of the Ford Motor Company.NOTE
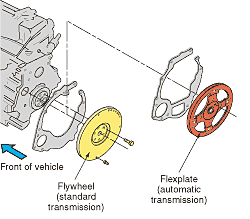 A flywheel and flexplate.
 Most crankshafts used with manual transmissions have a piot bushing or bearing located near the rear flange.
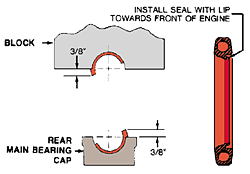 Neoprene rear seal installation.
  Replace the crankshaft sprocket before installing the crankshaft in the block.
 Careless installation of the crank sprocket can ruin it.
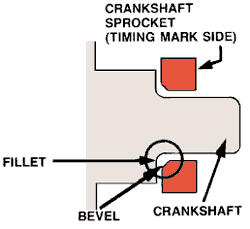 The inside edge of a crankshaft sprocket is beveled to clear the fillet on the crankshaft.
 Make sure that all crankshaft oil holes are clean.
 Clean the crankshaft rear sealing surface with crocus or emery cloth.
 Clean the main bearing bore.
 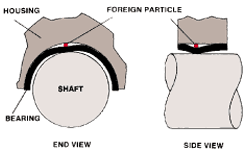 Results of careless cleaning. NOTE
 Snap the bearing into place.
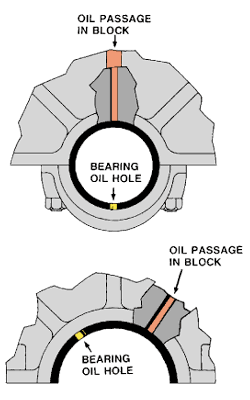 Installing the main bearings in the wrong positions can block the passage of oil to the journals.
  Checking crankshaft endplay with a feeler gauge.
  Checking crankshaft endplay with a dial indicator.NOTE
Details and diagrams to replace crankshaft.
Car crankshaft.
Crankshaft Operation:
A revolving part mounted in the lower portion of the engine block.
That part of a reciprocating compressor on which the wobble plate or connecting rods are attached.
Removing the Crankshaft
Removing the crankshaft will require engine removal and disassembly. before removing the crankshaft, it is a good practice to measure endplay and clearance. use a feeler gauge to measure clearance and a dial indicator to determine the amount of endplay.
The crankshaft is usually removed after removing the main bearing caps. Reverse the torque sequence of the main bearing cap bolts to prevent warpage.
WARNING- Remove the main cap bolts.
- Use a dial indicator torque wrench to see how tight they were.
- Remove the main caps. They fit tightly in the block.

- Normally, bearings are replaced. If bearings are reused, they must be returned to their original positions, as they have been wear-mated to the crank journals.
- Carefully lift out the crankshaft. It has a flywheel or flexplate bolted to it.

- The crank should be rested on end (vertically) during storage or hung in a rack to prevent warping. Leave the flywheel or flexplate bolted to the crank to help hold it upright during storage.
- Check to see if there is a pilot bearing or bushing in the rear of a standard transmission crankshaft. it can be removed with a slide hammer puller.

- Check the condition of the crankshaft surface where the rear main seal rides.
- Inspect the bearing surfaces of the crankshaft for wear. Measure the main and connecting rod journals with a micrometer and compare them to manufacturer's specifications.
- Inspect the thrust bearing surfaces. These surfaces control fore and aft movement of the crankshaft. Wear, which is unusual, is usually greatest on the rear side.

- Inspect the front upper bearing to see if there is any sign of wear resulting from belts that were too tight.
- Label the backs of the main bearings with a felt marker with their positions. The number one upper main bearing is marked 1U, the number one lower is marked 1L, and so on. Place them in a line to inspect them for wear.
Preparing the Crankshaft for Installation
Check the following items to prepare the crankshaft for installation:
- Remove the old crankshaft sprocket.
- If the new one is pressed-fit, install it before installing the crank in the block.

- This will prevent damage to the thrust main bearing surface when the sprocket is pounded on.
- Make certain that the woodruff key is perfectly flat in its groove in the crank.
- An improperly installed woodruff key can cause a cracked sprocket.

- The sprocket can be heated for easier installation if the crank is already in the block.
- Some crank sprockets slide easily into place.
- Install the sprocket with the timing mark facing outward.
- The inside edge of the sprocket has a chamfer that corresponds to the fillet on the crank; if the sprocket is backward it cannot be installed all the way.

- Be sure that all oil passages in the crank are clean.

- Run a small bore brush through all of the oil passages in the crankshaft and wipe the journals with a clean shop cloth.
- Be sure that the surface the rear seal rides on is clean. If it is not, clean it with very fine emery or crocus cloth.

- Prepare the block by cleaning the oil galleries again and wiping the bearing surfaces of the block and caps.
- Rotate the engine block so the crankcase is facing up.
- If the vehicle is equipped with a manual transmission, the crankshaft may be fitted with a pilot bushing or bearing.
- It is a good practice to replace this bushing because it maintains the centerline alignment between the crankshaft and transmission input shaft.
- Be sure the bearings are the correct size for the crankshaft and bores.
- Use the service manual to determine the correct bearings to be used.
Installing the Crankshaft
The crankshaft is heavy and awkward to handle. Improper handling can result in damage to the crankshaft, block, or bearings. To make installation of the crankshaft easier and safer, lift the crankshaft by the harmonic balancer journal and by bolts threaded into the rear flange. Keep the crankshaft parallel as it is lowered into the bearings. If it is installed properly, the crankshaft will seat squarely and be supported by the bearings. The crankshaft should rotate freely with no binding or restrictions. Correct any problems before continuing.
- Clean the main bearing bores to prevent oil clearance and heat transfer problems.

- If dirt is left on the bearing bore, the bearing can be forced against the crankshaft.

- Install the upper main bearings by pushing them into the main bearing bores.

- Be sure that the lubricating holes in the bearings line up properly with the corresponding holes in the block.

- Do not touch the bearing surface with your hands.
- Lubricate the bearings only on the surface that is toward the crankshaft.
- Check the bearing oil clearance with a plastigage.
- Install the crank and check the clearance again.
- The crankshaft is heavy and awkward to handle.
- Improper handling can result in damage to the crankshaft, block, or bearings.
- To make installation of the crankshaft easier and safer, lift the crankshaft by the harmonic balancer journal and by bolts threaded into the rear flange.
- Keep the crankshaft parallel as it is lowered into the bearings.
- If it is installed properly, the crankshaft will seat squarely and be supported by the bearings.
- The crankshaft should rotate freely with no binding or restrictions.
- Correct any problems before continuing.
- If the crank and/or the bearings are being reused, it is advisable to check each bearing's clearance.
- When using a reground crank and new bearings, check the main and rod bearings for proper clearance and to be sure that the right bearings are being installed.
- Remove the crankshaft and install the rear main seal.
- Be sure to offset the parting lines on a two-piece seal.
- Tighten the main caps.
- The main bearing caps must be installed to the correct saddle.
- In addition, the cap must be installed in the proper direction.
Install the main bearing caps, making sure they are matched to the box and face the correct direction. Reprinted with the permission of Ford Motor Company.
- Failure to follow these precautions can result in early bearing failure, crankshaft failure, or engine noises.
- Align the thrust bearing halves.
- After aligning the thrust halves, check crankshaft endplay with a feeler gauge or a dial indicator.


- Assemble the piston and piston rings.
- Install the rod bearings.
- Install the piston and rod assembly into the block.
- Check the installation of the piston and rod assembly.
This will help.
Thanks.
See below latest solved car problems :----
- After replacing brake rotors and pads brake pedal ...
- Brake pedal firm when engine not running goes to f...
- Obd Code P0763 on Lexus?
- Check engine light flashing?
- Gas door hinges broken on Toyota?
- Car radio works but CD player not working?
- What happens if Toyota Vehicle timing chain is not...
- Car suddenly died and wont start?
- No heat,blower blows only cold?
- Theft indicator not letting car to start?
- Car is starting but not turning over?
- Antifreeze leaks under the passenger side dash?
- Engine cranks but will not start?
- How to replace blower motor and blower motor resis...
- How to test alternator on Dodge Stratus?
- How to replace alternator 1997 Dodge Stratus?
- Transmission is making buzzing noise?
- where is wiper fuse located on1993 chevrolet subur...
- Error code p0402 on Ford Escape?
- Ford 4x4 front wheels will not engage?
- 4x4 will not engage on Ford F150?
- Ford 4 wheel drive vacuum solenoid working system?...
- 4x4 front differential will not engage the axle on...
- Kia Fuse box?
- Airbag fuse KIA Sorento?
- Saturn drive belt diagram? drive belt pulley diagr...
- Power steering and water pump pulley location on S...
- With AC and without AC drive belt routing diagram ...
- Power steering pulley location on Saturn L series ...
- Saturn drive belt tensioner diagram?
- Belt tensioner location diagram for Saturn L100?
- Front side of drive belt routing for Saturn L100?
- Drive belt routing diagram for Saturn L100?
- Antifreeze leaking from freeze plug on throttle bo...
- Antifreeze leaking from front of engine near Air i...
- Number of Freeze plugs on 1977 Oldsmobile motor?
- Where is freeze plug located on 1994 Oldsmobile 88...
- How to replace freeze plug on GMC Sierra?
- Where is freeze plug located on Jaguar S-Type?
- How to replace Blower motor on 1993 Buick Regal?
- How to replace blower motor on Chevrolet Beretta?...
- How to remove instrument panel on Chevrolet car?
- How to replace blower motor on 1990 Honda Accord?
- Nissan Sentra stuck in park?
- 2002 nissan sentra will not go out of park mode?
- Key Fob will not lock and unlock doors?
- KeyFob will open the doors but not start on BMW?
- Volkswagen Routan Fog Lamp Acivation code?
- Key wont turn in the ignition on Toyota land cruis...
- Dodge manual transmission will not go in reverse g...
- Dodge Automatic transmission will not go into reve...
- Dodge neon wont go in reverse?
- how to replace power steering pressure hose on mu...
- How to replace Adjustable Camshaft timing solenoid...
- B2 on Mercedes Benz?
- Heater quits heating after few minutes on Ford?
- Hummers headlights flashes while start?
- 2009 Chevy impala accelerator pedal sensor?
- How to replace rear brake pads on 2002 Lincoln con...
- steering service light came on 2004 Pontiac Grand ...
- Steering service light ON GMC Sierra Denali?
- Ford Windstar transmission fluid leaking?
- Ford Mondeo ST220 camshaft Timing specifications?
- Radio Power Antenna wiring diagram for 1992 Lincol...
- Stereo goes to Phone mode on Lincoln Town car?
- How to replace Rear Timing Belt Cover on Dodge Neo...
- How to replace Timing Belt Cover on Dodge Neon?
- How to replace Timing Belt and Tensioner on 2001 D...
- How to replace Timing Belt & Sprockets on 2001 Dod...
- How to replace timing belt on 2001 Dodge neon?
- Headlight wiring diagram for 1997 Lincoln Town Car...
- Lincoln Town Car Radio stereo wiring?
- Radio wiring diagram for 1997 Lincoln Town Car?
- How to replace fuel filter on 2000 holden VT Commo...
- Where is glow plug module located on 2005 Ford f35...
- Samsung Galaxy Vibrate activate?
- LG Slide Handset & Mobile LG GU 0220 Problem?
- Tv does not recognize the remote?
- Unable to make calls or send sms messages via blac...
- NP Code for mobile phone?
- What wire to connect to hook up trailer on Nissan...
- 1997 Nissan Sentra Tail light wiring diagram?
- Charging system problem on Chrysler LHS car?
- 1996 Chrysler LHS brake light circuit wiring diagr...
- Rear Tail light wiring diagram for 2000 Isuzu Rode...
- Cooling fan relays location on 1998 ford mustang?
- Loss of acceleration?
- Steering wheel problem on car?
- Ford Fuel pump Relay and fuse location diagram?
- Ford fuel pump fuse layout diagram?
- Ford inside fuse box diagram showing fuel pump rel...
- Airbag and srs light off on Mercedes ml 270?
- How i solved SRS and AIRBAG OFF light problem on M...
- where is power window fuse located on 2000 ford wi...
- Engine accelerates when brake is applied?
- How to replace heater core on Mitsubishi eclipse?
- How to replace heater core on Mitsubishi magna?
- dodge neon gauges not working?
- high rpm in neutral? Inconsistant high RPM in neu...
- Engine miss and truck jumps? Hard to down shift? I...
- Car running hot?
- Squeak and grinding sound is heard when brakes ar...
- idle flair is noticed on car? Rough idle? car will...
- 2002 Ford Focus sits over night and battery goes ...
- 1998 Ford F150 pickup Battery Drains overnight due...
- Pushing on the gas pedal, but the car slows down? ...
- Oil on spark plugs and car misfires?
- Where is blower motor relay located on 2005 Ford F...
- How to remove SRS airbag on honda odyssey?
- Timing belt diagram,replacing,valve clearance timi...
- Valve Lash Clearance Adjustment for 2005 Toyota La...
- Timing Belt, Cover, Sprockets, & Seal replacing fo...
- How to replace Timing belt on 2005 Toyota Land Cru...
- How to remove door panel on Hummer H3X?
- Chevy Silverado 2500 HD steering wheel replacing P...
- How to replace Tie Rod Ends on Chevy silverado 250...
- How to replace steering linkage on Chevrolet Silve...
- How to Replace power steering pump on Chevy silver...
- Power Recirculating Ball Steering Gear removal on ...
- How to replace Power steering rack and pinion gear...
- Chevy equinox quits heat after few minutes?
- Mitsubishi Lancer rpm needle bounces?
- 1983 ford f350 tow truck owners manual?
- Nissan Pathfinder Backfires?
- Nissan Pathfinder stalls and bucks on Acceleration...
- A/C, heater, defroster fan, not working?
- Heater AC or defroster fan not working on KIA?
- Temperature gauge stays At cold on jaguar?
- service engine soon light is ON?
- Ford explorer 4.0 will not idle when cold?
- Ford Ranger Battery light stays steady ON?
- Ford runs lean and idles rough?
- 1994 ford E150 Timing problem?
- No heat on Oldsmobile Silhouette?
- How to replace intake manifold gasket on Oldsmobil...
- Jeep backfires?
- Saturn vue 3.0 dual over cam timing mark details?
- Crankshaft and camshafts timing marks for Saturn V...
- Jeep starts with key in on position?
- Which fuse controls windscreen washer on vauxhall ...
- How to replace blower motor on Plymouth breeze?
- 1990 mazda 323 stalls and quit running?
- How to Add transmission fluid on 2002 Isuzu AXIOM?...
- Diagnostic code P0700, P1330, P1121 on KIA?
- Diagnostic code P1330 on Kia 2WD Sorento?
- 2003 Kia Sorento shows error code P1330?
- OBD code P1330 on 2003 Kia Sorento?
- P0352 Obd code on Toyota RAV4?
- OBD code P01300 on Toyota RAV4?
- P0174, P0037 and P2197 on Toyota RAV4?
- How to replace ignition coil for Toyota rav4?
- How to replace Cruise control plate on Ford Ranger...
- How to Deactivate Airbag system on Ford Ranger?
- Cruise control stop working on 1994 Ford ranger?
- Ford ranger cruise control not working?
- 2005 ford ranger cruise control not working?
- 1997 Chevy Tahoe Brake lights not working?
- Instrument Panel Fuse Box diagram for 1997 Chevy T...
- How to replace Brake light switch on Chevrolet Tah...
- Tail lights and dash light fuse keeps blowing on C...
- Heater problem on Isuzu Trooper?
- Blower fan not running on Isuzu trooper?
- Heater/AC blower motor not working on 1995 Isuzu T...
- Where is tail light fuse located on 1997 Chevy Tah...
- Wire running from oil pan to alternator?
- Gasoline burning smell and white smoke from exhaus...
- Chevy impala is sluggish to drive?
- Chevy Impala horn connections?
- Chevy Impala Horn wiring?
- 2003 Chevy impala power windows not working?
- where is cigarette lighter fuse located on 2004 Ch...
- Fuse box on Chevy impala?
- Where is Accessory power relay located on Chevy Im...
- where is fuse box located on 2003 Chevrolet Impala...
- Under hood fuse box diagram for 2003 Chevrolet Imp...
- Spark plug Replacing for chevy impala?
- Chevy impala spark plug firing order diagrams?
- How to gap spark plug on Chevy Impala?
- Rodgers programmable thermostat Stuck on cooling m...
- white rodgers thermostat 1f90-371 manual?
- Chevy freeze plug diagram?
- BMW trunk disassembly diagram?
- Procedure to open locked BMW car trunk?
- Manually open Locked BMW trunk?
- BMW trunk locked part 3?
- BMW trunk will not open part 2?
- Trunk will not open on BMW?
- BMW 318i trunk will not open part 1?
- Exclamation indicator light on ford freestar dash?...
- Vehicle wiring diagram?
- HO2S and Catalyst Monitor Sensors working procedur...
- O2 sensor location for ford freestar?
- Multi Function switch replacing?
- Replacing ABS unit on Buick Century?
- Dodge vehicle will not start after sitting overnig...
- Car starting issues?
- After disconnecting and reconnecting battery Merce...
- Engine seized due to oil burning ?
- Toyota car will not start?
- Toyota Corolla leaking oil from timing cover?
- Mercedes Benz 300TD wagon Diesel model will not st...
- Honda car will not start intermittently?
- Nissan car will not start?


No comments:
Post a Comment