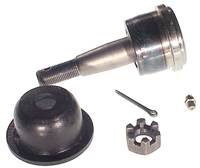
"Have you ever seen a vehicle where the tires go all the way up into the fenderwell? That's what happens when ball joints fail. The entire front end falls onto the tires."
Most likely your suspension will suffer damage and your car will become uncontrollable, fine at 5mph but at 60mph+ you could seriously injure yourself or someone else.Don't drive the car until its repaired.
How to Test Upper and Lower Ball Joint?
http://repairhelpcenter.blogspot.com/2011/12/how-to-test-lower-ball-joint.html
How to inspect Upper and Lower Ball joint?
How to Service Upper and Lower Ball Joints on Car?
http://repairhelpcenter.blogspot.com/2011/12/how-to-service-lower-ball-joints-on-car.html
The ball joint is connected to the steering knuckle with a tapered connection, called a steering taper, which is also used in other steering connections.
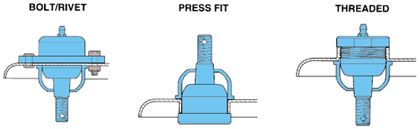
Three common ball joint retaining methods.
Some ball joints are held in with rivets from the factory. The rivets are drilled and punched to remove them. Bolts and nuts are used to hold the replacement joint in place.
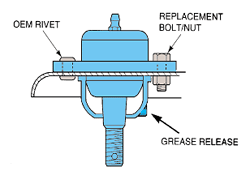 Original equipment rivets are replaced with nuts and bolts.
The most common method is press fit. Some manufacturers require you to replace the entire control arm assembly if a ball joint is to be replaced. In these cases, the ball joint and control arm are made as a single assembly and individual parts are not available.
If the control arm has been removed from the vehicle, a pressed-fit ball joint can be removed using a standard hydraulic press. when the control arm is still on the car, a special press set allows the removal and replacement of these ball joints. some pressed-fit ball joints have a spot weld that holds them in place. this must be carefully removed. when a replacement ball joint is installed, a snap ring often takes the place of the weld.
Most likely your suspension will suffer damage and your car will become uncontrollable, fine at 5mph but at 60mph+ you could seriously injure yourself or someone else.Don't drive the car until its repaired.
So if ball joint is failed,then it has to be tested/inspected then replaced.
For ball joint testing inspecting procedure,check the link mentioned below :----
How to Test Upper and Lower Ball Joint?
http://repairhelpcenter.blogspot.com/2011/12/how-to-test-lower-ball-joint.html
How to inspect Upper and Lower Ball joint?
http://repairhelpcenter.blogspot.com/2011/12/how-to-inspect-lower-ball-joint.html
How to Service Upper and Lower Ball Joints on Car?
http://repairhelpcenter.blogspot.com/2011/12/how-to-service-lower-ball-joints-on-car.html
If its tested faulty,then ball joint has to be replaced.In that case follow the procedure mentioned below.
Removing Ball Joint Tapers from the Steering Knuckle:---
The ball joint is connected to the steering knuckle with a tapered connection, called a steering taper, which is also used in other steering connections.
See the diagram shown below for better understanding.
 A ball joint taper. Courtesy of Moog Automotive, Inc.
To remove a ball joint requires the use of a ball joint remover.
Another way of "breaking" the taper is to use a large hammer.
To remove a ball joint requires the use of a ball joint remover.
Another way of "breaking" the taper is to use a large hammer.
- First, remove the cotter pin from the ball joint nut and loosen the nut several turns.
- Position the vehicle so that the coil spring is pushing on the ball joint. This could require lifting the vehicle or allowing its weight to rest on the wheels.
- Use a hammer to pound sharply on the steering knuckle on the outside of the taper. this will deform the taper and spring pressure will separate the ball joint from the steering knuckle.
Removing the Ball Joint from the Control Arm
A ball joint can be retained by one of several methods.You can try which ever suits your car model ball joint.The help diagram is shown below:-----
Some ball joints are held in with rivets from the factory. The rivets are drilled and punched to remove them. Bolts and nuts are used to hold the replacement joint in place.
See below the help diagram:-----
The most common method is press fit. Some manufacturers require you to replace the entire control arm assembly if a ball joint is to be replaced. In these cases, the ball joint and control arm are made as a single assembly and individual parts are not available.
If the control arm has been removed from the vehicle, a pressed-fit ball joint can be removed using a standard hydraulic press. when the control arm is still on the car, a special press set allows the removal and replacement of these ball joints. some pressed-fit ball joints have a spot weld that holds them in place. this must be carefully removed. when a replacement ball joint is installed, a snap ring often takes the place of the weld.
NOTE:-----
Be sure the grease release hole in the new ball joint's rubber boot is aimed away from the brakes.
Be sure the grease release hole in the new ball joint's rubber boot is aimed away from the brakes.
This details will help you.
----------
The car will not start?
Car will not crank?
Car has no spark?
How to troubleshoot car battery?
How to test starter solenoid?
http://schematicsdiagram.blogspot.com/2011/06/how-to-test-starter-solenoid.html
--------------------
How to test cars starter?
http://schematicsdiagram.blogspot.com/2011/06/how-to-test-cars-starter.html
How to replace starter in car?
car will turn over but will not start?
Car wont start?
If you need dis-assembly or replacement instructions for any other auto/car part, or you want to ask question related to your car/truck jeep problem then please leave the comment with your details, so I can provide you the required instructions and solutions.
For more car related problem troubleshooting:---
This are the sections, you can go through and click the link to read its troubleshooting.
---------
The car will not start?
-----------------
Car will not crank?
-----------
Car has no spark?
-------------
How to troubleshoot car battery?
-----------------
How to test starter solenoid?
http://schematicsdiagram.blogspot.com/2011/06/how-to-test-starter-solenoid.html
--------------------
How to test cars starter?
http://schematicsdiagram.blogspot.com/2011/06/how-to-test-cars-starter.html
How to replace starter in car?
-----------
car will turn over but will not start?
-----------------
Car wont start?
----------