@

Showing posts with label car problems. Show all posts

Sunday, December 11, 2011

How to Replace upper and Lower Ball joints?

"Have you ever seen a vehicle where the tires go all the way up into the fenderwell? That's what happens when ball joints fail. The entire front end falls onto the tires."
Most likely your suspension will suffer damage and your car will become uncontrollable, fine at 5mph but at 60mph+ you could seriously injure yourself or someone else.Don't drive the car until its repaired.
So if ball joint is failed,then it has to be tested/inspected then replaced.
For ball joint testing inspecting procedure,check the link mentioned below :----

If its tested faulty,then ball joint has to be replaced.In that case follow the procedure mentioned below.

Removing Ball Joint Tapers from the Steering Knuckle:---

The ball joint is connected to the steering knuckle with a tapered connection, called a steering taper, which is also used in other steering connections.
See the diagram shown below for better understanding.
A ball joint taper. Courtesy of Moog Automotive, Inc.


To remove a ball joint requires the use of a ball joint remover.

Another way of "breaking" the taper is to use a large hammer.
  • First, remove the cotter pin from the ball joint nut and loosen the nut several turns.
  • Position the vehicle so that the coil spring is pushing on the ball joint. This could require lifting the vehicle or allowing its weight to rest on the wheels.
  • Use a hammer to pound sharply on the steering knuckle on the outside of the taper. this will deform the taper and spring pressure will separate the ball joint from the steering knuckle.
Removing the Ball Joint from the Control Arm
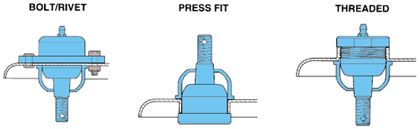
A ball joint can be retained by one of several methods.You can try which ever suits your car model ball joint.

The help diagram is shown below:-----


Three common ball joint retaining methods.
Some ball joints are held in with rivets from the factory. The rivets are drilled and punched to remove them. Bolts and nuts are used to hold the replacement joint in place.
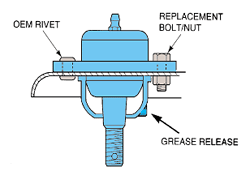

See below the help diagram:-----

Original equipment rivets are replaced with nuts and bolts.

The most common method is press fit. Some manufacturers require you to replace the entire control arm assembly if a ball joint is to be replaced. In these cases, the ball joint and control arm are made as a single assembly and individual parts are not available.
If the control arm has been removed from the vehicle, a pressed-fit ball joint can be removed using a standard hydraulic press. when the control arm is still on the car, a special press set allows the removal and replacement of these ball joints. some pressed-fit ball joints have a spot weld that holds them in place. this must be carefully removed. when a replacement ball joint is installed, a snap ring often takes the place of the weld.

NOTE:-----
Be sure the grease release hole in the new ball joint's rubber boot is aimed away from the brakes.

This details will help you.
----------
If you need dis-assembly or replacement instructions for any other auto/car part, or you want to ask question related to your car/truck jeep problem then please leave the comment with your details, so I can provide you the required instructions and solutions.

For more car related problem troubleshooting:---

This are the sections, you can go through and click the link to read its troubleshooting.

---------

The car will not start?

-----------------

Car will not crank?


-----------

Car has no spark?


-------------

How to troubleshoot car battery?

-----------------

How to test starter solenoid?

http://schematicsdiagram.blogspot.com/2011/06/how-to-test-starter-solenoid.html

--------------------

How to test cars starter?

http://schematicsdiagram.blogspot.com/2011/06/how-to-test-cars-starter.html

How to replace starter in car?


-----------

car will turn over but will not start?


-----------------

Car wont start?


----------


Monday, November 28, 2011

1991 Honda Accord Timing Belt Details?

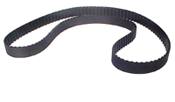
The belt through which the crankshaft drives the camshaft or camshafts in an overhead valve or overhead cam engine.

This is how basically,the timing belt looks:---
You can buy timing belt from Autozone service centers.

If you need complete timing belt replacing procedure for your Honda Accord then Click the link below :----

How to Replace Honda Accord Timing belt and Timing belt cover?


But If you require Enlarged timing belt routing Diagram for 1991 Honda Accord car model then

Honda Timing belt Diagram is Divided in to 7 parts.
Check out this timing belt part diagram below:---

1991 Honda Timing belt Diagram Part 1?


1991 Honda Timing belt Diagram Part 2?


http://technoanswers.blogspot.com/2011/11/1991-honda-timing-belt-diagram-part-2.html

1991 Honda Timing belt Diagram Part 3?

1991 Honda Timing belt Diagram Part 4?


1991 Honda Timing belt Diagram Part 5?


1991 Honda Timing belt Diagram Part 6?


1991 Honda Timing belt Diagram Part 7?


This basic details will help you.
------------

For all types of

Timing belt routing diagrams for cars and trucks?

Click the link below:---

For all types of 

Drive belt routing diagrams for cars and trucks?

Click the link below:---
http://technoanswers.blogspot.com/2011/10/drive-belt-routing-diagrams-for-cars.html

Saturday, November 26, 2011

Where is Cabin Air Filter located on 2001 Chevrolet Truck Silverado?

The Cabin Air Filter(s) used to clean impurities from the outside air before it enters the passenger compartment through the vent system.

On Chevy silverado models the Cabin Air-filter is located under dash.

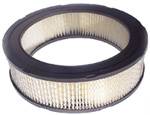
This is how this filter looks basically:----

You can buy this filter part from auto zone service center or from car dealer.

-----------------
For more car related problem troubleshooting:---

This are the sections, you can go through and click the link to read its troubleshooting.

---------

The car will not start?

-----------------

Car will not crank?


-----------

Car has no spark?


-------------

How to troubleshoot car battery?

-----------------

How to test starter solenoid?

http://schematicsdiagram.blogspot.com/2011/06/how-to-test-starter-solenoid.html

--------------------

How to test cars starter?

http://schematicsdiagram.blogspot.com/2011/06/how-to-test-cars-starter.html

How to replace starter in car?


-----------

car will turn over but will not start?


-----------------

Car wont start?


----------

Friday, November 25, 2011

Car Alternator Making noise?

If you need dis-assembly or replacement instructions for any other auto/car part, or you want to ask question related to your car/truck jeep problem then please leave the comment with your details, so I can provide you the required instructions and solutions.


Noises that come from the AC generator can be from three sources. The causes of the noises are identifiable by the type of noise they make. A loose belt will make a squealing noise. Check the belt condition and tension. Replace the belt if necessary.
Squealing
A squealing noise can also be caused by faulty bearings. The bearings are used to support the rotor in the housing halves. To test for bearing noises, use a length of hose, a long screwdriver, or a technician's stethoscope. By placing the end of the probe tool close to the bearings and listening on the other end, any bearing noise will be transmitted so you will be able to hear it. Bearing replacement will require disassembly of the AC generator.
CAUTION
This test is performed with the engine running. Use caution around the drive belts, fan, and other moving components.
Whining
A whining noise can be caused by shorted diodes or stator, or by a dry rotor bearing. A quick way to test for the cause of a whining sound is to disconnect the wiring to the generator. Then start and run the engine. If the noise is not there, the cause of the noise is a magnetic whine due to shorted diodes or stator windings. Use a scope to verify the condition of the diodes and stator. If the noise remains, the cause is mechanical and probably due to worn bearings.
---------
For more help,related to car Alternator,check out the list below:----

How to inspect Vehicles Alternator?


How to Test Vehicles Alternator?


How to Service Vehicles Alternator?


How to Replace Alternator?


How to monitor Vehicles charging system?


-----------------
For more car related problem troubleshooting:---

This are the sections, you can go through and click the link to read its troubleshooting.

---------

The car will not start?

-----------------

Car will not crank?


-----------

Car has no spark?


-------------

How to troubleshoot car battery?

-----------------

How to test starter solenoid?

http://schematicsdiagram.blogspot.com/2011/06/how-to-test-starter-solenoid.html

--------------------

How to test cars starter?

http://schematicsdiagram.blogspot.com/2011/06/how-to-test-cars-starter.html

How to replace starter in car?


-----------

car will turn over but will not start?


-----------------

Car wont start?


----------
How to monitor Vehicles charging system?

If you need dis-assembly or replacement instructions for any other auto/car part, or you want to ask question related to your car/truck jeep problem then please leave the comment with your details, so I can provide you the required instructions and solutions.


It is very important to monitor charging system performance during the course of vehicle operation. Vehicles are equipped with an ammeter, voltmeter, or indicator light. These allow the driver to monitor the charging system.
Ammeter
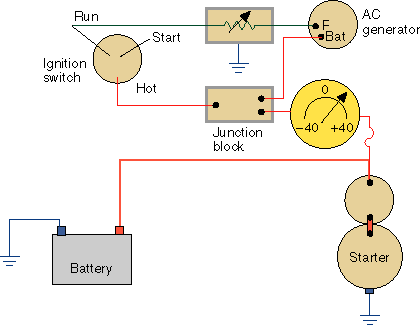
The ammeter is placed in series with the circuit to monitor current flow into or out of the battery.
Ammeter connected in series with the charging system to monitor its operation.
When the AC generator is delivering current to the battery, the ammeter shows a positive (+) indication. When not enough current (or none at all) is being supplied, the result is a negative ( - ) indication. This is because the current flow is in the opposite direction, from the battery to the electrical system.
Indicator Light
This is the simplest and most common method of monitoring AC generator performance. When the charging system fails to supply sufficient current, the light turns on. However, when the ignition switch is first activated, the light also comes on. This is due to the fact that the AC generator is not providing power to the battery and other electrical circuits. Thus, the only current path is through the ignition switch, indicator light, voltage regulator, part of the AC generator, and ground, then back through the battery.
Electronic regulator with an indicator light “on” due to no AC generator output.
Only the battery, regulator, and alternator are in the circuit. With no current flowing through the indicator light, it goes out.
With the engine running, the indicator light comes on again if the electrical load is more than the AC generator can supply. This occasionally happens when the engine is idling. If there are no problems, the light should go out as the engine speed is increased. If it does not, either the AC generator or regulator is not working properly.
On late-model cars, the indicator light can be combined with the oil pressure warning light; it usually is labeled "engine." If this light turns on while the engine is running, either the AC generator is not charging or the oil pressure is low - or both.
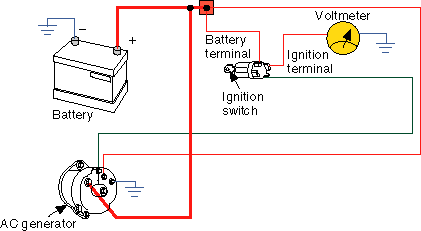
Voltmeter
Voltmeters indicate the amount of voltage across an electrical circuit. The voltmeter shown below measures battery voltage when the ignition switch is in the run position.
Voltmeter connected to the charging circuit to monitor its operation.
A fully charged battery indicates just over 12 volts. As energy is taken from the battery, the voltmeter reading drops. At the same time, the voltage regulator senses this and raises the charging voltage output to 14 volts or more. When the battery has been recharged, the AC generator cuts back. The voltmeter now shows the fully charged battery voltage of just over 12 volts again. This on again, off again action of the AC generator is constantly monitored by the voltmeter.

-----------
For more Alternator help,check out the list below:----

How to inspect Vehicles Alternator?


How to Test Vehicles Alternator?


How to Service Vehicles Alternator?


How to Replace Alternator?


For more car related problem troubleshooting:---

This are the sections, you can go through and click the link to read its troubleshooting.

---------

The car will not start?

-----------------

Car will not crank?


-----------

Car has no spark?


-------------

How to troubleshoot car battery?

-----------------

How to test starter solenoid?

http://schematicsdiagram.blogspot.com/2011/06/how-to-test-starter-solenoid.html

--------------------

How to test cars starter?

http://schematicsdiagram.blogspot.com/2011/06/how-to-test-cars-starter.html

How to replace starter in car?


-----------

car will turn over but will not start?


-----------------

Car wont start?


----------


How to Replace Alternator?

If you need dis-assembly or replacement instructions for any other auto/car part, or you want to ask question related to your car/truck jeep problem then please leave the comment with your details, so I can provide you the required instructions and solutions.


Before directly,going to replace alternator,its advisable to inspect,test and try alternator servicing.But if all that is not helping then get the Alternator replaced.


Alternator testing,servicing and replacing instructions are as follows :---

How to inspect Vehicles Alternator?


How to Test Vehicles Alternator?


How to Service Vehicles Alternator?


For Alternator replacing procedure,the details are as follows :---

Follow service manual procedures given by the manufacturer for the generator you are working on for disassembling, inspecting, testing, and rebuilding AC generators. Remember, improper connections to an AC generator can destroy it.
AC generator removal varies according to the engine size, engine placement, and vehicle accessories (such as power steering and air conditioning). The following is the typical procedure for removal and replacement of the AC generator.
  • Place fender covers over the fenders
  • Disconnect the battery ground cable
CAUTION
Never attempt to remove the alternator or disconnect any wires to the alternator without first disconnecting the battery negative cable.It's a good practice to wrap the cable with tape or insert the cable inside a rubber hose to prevent accidental contact with the battery terminal.Always wear safety glasses when working around the battery.
  • Disconnect and label the wiring harness connections to the alternator (Painters Masking tape works very well for labeling Automotive wiring).
  • Loosen the alternator pivot bolt.
  • Remove the bolt that attaches the alternator to the adjustment arm.
  • Rotate the alternator to loosen the drive belt and disengage the belt from the pulley. Be careful that any spacers that are used in mounting are kept with their original bolts. This will make correct reinstallation much easier.
  • While supporting the alternator remove the pivot bolt.
  • Remove the alternator from the vehicle.
To reinstall the alternator, reverse the removal procedure.
To adjust the belt tension, leave the pivot and adjusting arms loose. Look up the belt tension specification for the vehicle you are working on. Using a belt tension gauge on the belt apply pressure to the alternator until the correct belt tension registers on the gauge and tighten the mounting and adjustment bolts to the specified torque specification.
CAUTION
Over tightening of the alternator drive belt will cause the unit to whine and premature failure of the alternator drive end bearing, the water pump or the engine crankshaft.

------------
For more car related problem troubleshooting:---

This are the sections, you can go through and click the link to read its troubleshooting.

---------

The car will not start?

-----------------

Car will not crank?


-----------

Car has no spark?


-------------

How to troubleshoot car battery?

-----------------

How to test starter solenoid?

http://schematicsdiagram.blogspot.com/2011/06/how-to-test-starter-solenoid.html

--------------------

How to test cars starter?

http://schematicsdiagram.blogspot.com/2011/06/how-to-test-cars-starter.html

How to replace starter in car?


-----------

car will turn over but will not start?


-----------------

Car wont start?


----------


@