@

Showing posts with label car battery troubleshooting. Show all posts

Monday, December 12, 2011

Car Battery Servicing?

When car battery is tested weak and or inspected dirty then before replacing car battery,first service the car battery and see if it starts operating.Also if battery looks dirty,then as a regular car maintenance service/ clean your car battery.
First go through this details to understand your car battery.

How to Inspect Car battery?

http://repairhelpcenter.blogspot.com/2011/12/how-to-inspect-car-battery.html

How to Test Car Battery?

http://repairhelpcenter.blogspot.com/2011/12/how-to-test-car-battery.html

Now go through this details below to service your cars battery.

Cleaning Your Battery
Before removing battery connectors or the battery itself for cleaning or other service, always neutralize accumulated corrosion on terminals, connectors, and other metal parts.
  • Always wear the proper safety equipment when working with batteries. use safety glasses and rubber gloves.
  • Apply a solution of baking soda and water or ammonia and water.
  • If you use a baking soda solution, use one tablespoon of baking soda to eight ounces of warm water.
  • Do not splash the corrosion onto the vehicle's paint, metal or rubber parts, or onto your hands and face.
  • Be sure the solution cannot enter the battery cells.
  • A stiff bristle brush is ideal for removing heavy buildup. Dirt and accumulated grease can be removed with a detergent solution or solvent.
  • After cleaning, rinse the battery and cable connections with clean water. Dry the components with a clean rag or low-pressure compressed air.
  • Remove the battery cables ends, and soak them in your cleaning solution. Rinse thoroughly.
Then, follow the instructions below to thoroughly clean your battery.
  • Remove your battery.
Mix a solution of baking soda and water.
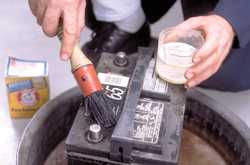
Brush the baking soda solution over the battery case, but don't allow the solution to enter the cells of the battery.


WARNING
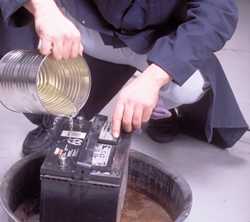
Allowing the solution to enter the cells of the battery creates a safety hazard and can also destroy the battery.
Flush the baking soda off with water.
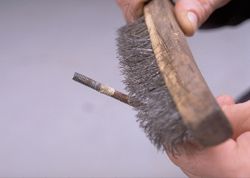
Use a scraper and wire brush to remove corrosion from the hold-down hardware.
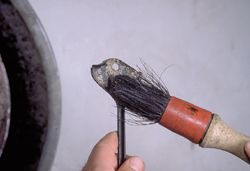
Brush the baking soda solution over the hold-down hardware and then flush with water.

Allow the hardware to dry, then paint it with corrosion-proof paint.
  • Use a terminal cleaner brush to clean the battery cables.
  • Use a terminal cleaner brush to clean the battery posts.
  • Install the battery back into the tray. Also install the hold-down hardware.
  • Install the positive battery cable. Then install the negative cable.
  • Coat the terminals with corrosion preventative spray, then check the job by starting the car.
Battery Charging
Both fast- and slow-charging units are used to recharge batteries. Each has its advantages. Fast chargers are the most popular. They charge batteries at a higher rate or charge--usually 40 amperes for 12-volt batteries and 70 amperes for 6-volt batteries. At this rate, fast chargers can recharge most batteries in about 1 hour. However, batteries must be in good condition to accept a fast charge. Sulfation on the plates of the battery can lead to excessive gassing, boiling, and heat buildup during fast charging. Never fast charge a battery that shows evidence of sulfation buildup or separator damage.
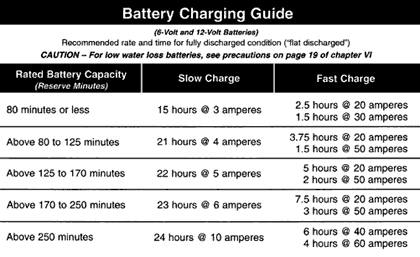
Trickle chargers provide low charging currents of about 5 to 15 amperes. Slow charging may require 12 to 24 hours but is the only safe way of charging sulfated batteries. In general, almost any battery can be charged at any current rate as long as excessive electrolyte gassing does not occur and the electrolyte temperature does not exceed 125°F (51.6°C). However, when time is available, slow charging is the safest and easiest method to use. In fact, many fast chargers can be adjusted to provide slow charging. The basic rule of thumb for slow charging a battery is 1 ampere for each positive plate in one cell. Use the chart below to determine the rate of charge according to the reserve capacity of the battery.

See this sample help guide for battery charge:-----
Table showing the rate and time of slow charging a battery according to reserve 


capacity. Courtesy of Battery Council International.
  • Perform charging in a well-ventilated area away from sparks and open flames.
  • Always be sure the charger is off before connecting or disconnecting the leads to the battery.
  • Remember to wear eye protection, and never attempt to charge a frozen battery.
  • All battery chargers have manufacturer-specific characteristics and operating instructions that must be followed.
  • When charging a battery in the vehicle, always disconnect the battery cables to avoid damaging the generator or other electrical components.
WARNING
Do not exceed the manufacturer's battery charging limits. Also, never charge the battery if the built-in hydrometer registers clear or light yellow. Replace the battery.

This basic procedure will help you to inspect and confirm the car battery problem.

This details will help you.
----------
If you need dis-assembly or replacement instructions for any other auto/car part, or you want to ask question related to your car/truck jeep problem then please leave the comment with your details, so I can provide you the required instructions and solutions.

For more car related problem troubleshooting:---

This are the sections, you can go through and click the link to read its troubleshooting.

---------

The car will not start?

-----------------

Car will not crank?


-----------

Car has no spark?


-------------

How to troubleshoot car battery?

-----------------

How to test starter solenoid?

http://schematicsdiagram.blogspot.com/2011/06/how-to-test-starter-solenoid.html

--------------------

How to test cars starter?

http://schematicsdiagram.blogspot.com/2011/06/how-to-test-cars-starter.html

How to replace starter in car?


-----------

car will turn over but will not start?


-----------------

Car wont start?


----------

How to Test Car Battery?

When car battery gets old,it gets weak and you notice no start problem on car.The lights and other electrical components not functioning right,can also be due to weak battery.A car loosing its charge and battery needs to charge again n again.Then this is indication of weak car battery.In that case battery has to be replaced.But its advisable to test car battery before replacing it.
So first inspect your car battery.

http://repairhelpcenter.blogspot.com/2011/12/how-to-inspect-car-battery.html

If the other aspects like battery and its cables all looks good,then test the battery voltage and its condition.The details are as follows :----

Depending on the design of the battery, state of charge and capacity can be determined in several ways: specific gravity tests, visual inspection of batteries with a built-in hydrometer, open circuit voltage tests, and the capacity test.
Specific Gravity Tests:----

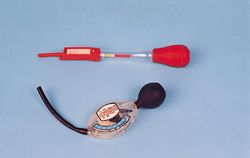
On unsealed battery designs, the specific gravity of the electrolyte can be measured to give a fairly good indication of the battery's state of charge. A hydrometer is used to perform this test.
See the sample image below:----
Two types of battery hydrometers.In the Diagram above you can see.

A basic battery hydrometer consists of a glass tube or barrel, rubber bulb, rubber tube, and a glass float or hydrometer with a scale built into its upper stem. The glass tube encases the float and forms a reservoir for the test electrolyte. Squeezing the bulb pulls electrolyte into the reservoir.

When filled with test electrolyte, the sealed hydrometer float bobs in the electrolyte. The depth to which the glass float sinks in the test electrolyte indicates its relative weight compared to water. The reading is taken off the scale by sighting along the level of the electrolyte.

If the hydrometer floats deep in the electrolyte, the specific gravity is low.
Figure A - when the scale sinks in the electrolyte, the specific gravity is low; Figure B - when it floats high, the specific gravity is high.

If the hydrometer floats shallow in the electrolyte, the specific gravity is high.

Temperature Correction
At high and low electrolyte temperatures, it is necessary to correct the reading by adding or subtracting 4 points (0.004) for each 10°F (-12°C) above or below the standard of 80°F (26.7°C). Most hydrometers have a built-in thermometer to measure the temperature of the electrolyte (Figure 16- 26). The hydrometer reading can be misleading if the hydrometer is not adjusted properly. For example, a reading of 1.260 taken at 20°F (-6.6°C) would be 1.260 - (6 * 0.004 or 0.024) = 1.236. This lower reading means the cell has less charge than indicated.It is important to make these adjustments at high and low temperatures to determine the battery's true state of charge.

Interpreting Results:---The specific gravity of the cells of a fully charged battery should be near 1.265 when adjusted for electrolyte temperature. Recharge any battery if the specific gravity drops below an average of 1.230. A specific gravity difference of more than 50 points between cells is a good indication of a defective battery in need of replacement.

Built-In Hydrometer:----On some sealed maintenance-free batteries, a special temperature-compensated hydrometer is built into the battery cover.
See below the Arrow is pointing towards it.

Sight glass in maintenance-free battery.

  1. A quick visual check indicates the battery's state of charge.
  2. The hydrometer has a green ball within a cage that is attached to a clear plastic rod. 
  3. The green ball floats at a predetermined specific gravity of the electrolyte that represents about a 65% state of charge.
  4. When the green ball floats, it rises within the cage and positions itself under the rod.
Visually, a green dot then shows in the center of the hydrometer.
The sample help diagram below:----

Design and operation of built-in hydrometer on maintenance-free sealed batteries.

  1. The built-in hydrometer provides a guide for battery testing and charging.
  2. In testing, the green dot means the battery is charged enough for testing. If the green dot is not visible and has a dark appearance, it means the battery must be charged before the test procedure is performed.
  3. Many maintenance-free batteries do not have a built-in hydrometer. A voltage check is the only way to check this type of battery's state of charge. The specific gravity of these batteries cannot be checked because they are sealed.
  4. NEVER pry off the cell caps to check the electrolyte levels or condition of a sealed battery.


Open Circuit Voltage Test:---
An open circuit voltage check can be used as a substitute for the hydrometer specific gravity test on maintenance-free sealed batteries. As the battery is charged or discharged, slight changes occur in the battery's voltage. So battery voltage with no load applied can give some indication of the state of charge.
  • The battery's temperature should be between 60° and 100°F (15.5° and 37.7°C).
  • The voltage must be allowed to stabilize for at least 10 minutes with no load applied.
  • On vehicles with high drains (computer controls, clocks, and accessories that always draw a small amount of current), it may be necessary to disconnect the battery ground cable.
  • On batteries that have just been recharged, apply a heavy load for 15 seconds to remove the surface charge.
  • Then allow the battery to stabilize.
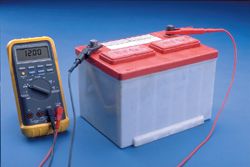
  • Once voltage has stabilized, use a voltmeter to measure the battery voltage to the nearest one-tenth of a volt.


Use the table below to interpret the results. As you can see, minor changes in battery open circuit voltage can indicate major changes in state of charge.
If the open circuit voltage test indicates a charge of below 75% of full charge, recharge the battery and perform the capacity test to determine battery condition.
Battery Leakage Test
  • To perform a battery leakage test, set a voltmeter on a low DC volt range.
  • Connect the negative test lead to the battery negative terminal.
  • Then move the meter's positive lead across the top and sides of the battery case.

Performing a battery leakage test.
  • If some voltage is read on the voltmeter, current is leaking out of the battery cells.
  • The battery should be cleaned, then rechecked.
  • If the battery again has some leakage, it should be replaced because the case is excessively porous or is cracked.
Battery Drain Test
If a vehicle's battery is dead after it has not been used for a short while, the problem may be a current drain caused by one of the electrical systems. The most common cause for this type of drain is a light that is not turning off--such as a light in the glove box, trunk, or engine compartment.
The procedure for performing a battery drain test varies according to the manufacturer.
  • However, battery drain can often be observed by connecting an ammeter in series with the negative cable or by placing the inductive ammeter lead around the negative cable.
  • If the meter reads 0.25 or more amps, there is excessive drain.
  • Visually check the trunk, glove box, and under hood lights to see if they are on. If they are, remove the bulb and watch the battery drain. If the drain is now within specifications, find out why the circuit is staying on and repair the problem.
  • If the cause of the drain is not the lights, go to the fuse panel or distribution center and remove one fuse at a time while watching the ammeter.
  • When the drain decreases, the circuit protected by the fuse you removed last is the source of the problem.
To test for battery drains using a high-current tester, follow these steps:
  • Turn off all accessories.
  • Remove the underhood lamp, if equipped.
  • Disconnect the negative battery cable.
  • Attach the multiplying coil between the negative battery cable and the battery terminal post.
Using a multiplying coil to obtain accurate readings when measuring parasitic drains with a VAT-40 or similar tester.
  • Zero the ammeter.
  • Connect the inductive pickup probe around the multiplying coil.
  • Read the ammeter.
  • The maximum permissible current drain is 0.05 ampere.
  • If the current drain exceeds this limit, remove the fuses, one at a time, as discussed earlier.

This basic procedure will help you to inspect and confirm the car battery problem.

This details will help you.
----------
If you need dis-assembly or replacement instructions for any other auto/car part, or you want to ask question related to your car/truck jeep problem then please leave the comment with your details, so I can provide you the required instructions and solutions.

For more car related problem troubleshooting:---

This are the sections, you can go through and click the link to read its troubleshooting.

---------

The car will not start?

-----------------

Car will not crank?


-----------

Car has no spark?


-------------

How to troubleshoot car battery?

-----------------

How to test starter solenoid?

http://schematicsdiagram.blogspot.com/2011/06/how-to-test-starter-solenoid.html

--------------------

How to test cars starter?

http://schematicsdiagram.blogspot.com/2011/06/how-to-test-cars-starter.html

How to replace starter in car?


-----------

car will turn over but will not start?


-----------------

Car wont start?


----------


@