@

Sunday, February 26, 2012

Speedometer not working on 1993 Ford F350?

That one most likely is the sensor in the rear axle housing. is the abs yellow light on? If it is it is def that sensor. If it is not on check the plug on the housing and if that looks good a would put a sensor in it. they are around 15-20 bucks I have done a boat load of these too.


Turn ignition off. Remove PCM 60-pin connector. Inspect terminals, and repair if damaged. Install Breakout Box (T83L-50-EEC-IV), leaving PCM disconnected. Measure resistance between test pins No. 3 and 6 at breakout box. If reading is 21-55 k/ohms, go to step 4). If resistance is not 21-55 k/ohms, go to next step.
Check PSOM Circuit Continuity Ensure ignition is off. Disconnect PSOM wiring harness connector. Measure resistance between test pin No. 3 at breakout box and PSOM (+) circuit at PSOM wiring harness connector. Measure resistance between test pin No. 6 at breakout box and PSOM (-) circuit at PSOM wiring harness connector. If resistance is more than 5 ohms, repair open circuit and repeat QUICK TEST. If resistance is 5 ohms or less, go to next step.
Check PSOM Circuit For Open Ensure ignition is off. Measure resistance between test pin No. 3 and test pins No. 6, 37 and 40 at breakout box. If resistance is 10 k/ohms or less, repair open circuit and repeat QUICK TEST. If resistance is more than 10 k/ohms, go to next step.
Check RABS Sensor Resistance Turn ignition off. Remove RABS connector. See Fig. 19. Measure resistance between connector terminals, If resistance is not 1300-1550 ohms, replace RABS and repeat QUICK TEST. If resistance is 1300-1550, go to next step.
Check PSOM Output Voltage Turn ignition off. Connect PCM to breakout box. Connect wiring harness connector to PSOM. Set DVOM on 20-volt AC scale. Start engine, and warm to normal operating temperature. Using an assistant, measure voltage between test pins No. 3 and 6 while gradually increasing vehicle speed to 50 MPH. If maximum voltage is less than 4 volts, fault is in instrument cluster. If maximum voltage received is more than 4 volts, replace PCM.

See the diagram shown below :---

graphic

This will help.
Thanks.

See below latest solved car problems :----


How to trouble shoot speedometer?

1996 fiat bravo speedometer not working?

http://technoanswers.blogspot.com/2012/01/1996-fiat-bravo-speedometer-not-working.html

Speedometer works but odometer not working?

http://technoanswers.blogspot.in/2012/01/speedometer-works-but-odometer-not.html

Speedometer runs backward?

Warning lights on and speedometer died?


ABS & Brake lights warning indicator steady on dash and speedometer not working for Dodge Ram?

Vehicles Cluster panel Not reading Miles?

Odometer works properly but speedometer works intermittently?

http://technoanswers.blogspot.com/2012/01/odometer-works-properly-but-speedometer.html


1993 Ford F350 wipers not working?

Wipers not working.
It can be the issue with wiper motor or wiper switch or wiper control wiring.

Try this ,turn the wipers on and see if you hear any kind of roaring or humming noise. Basically this comes from behind the glove box. Its like a clicking noise.
Also as you turn the intermediate wiper switch you can hear the same noise at ech setting.Try this
Can you hear any such noise.

Above the right kick panel on your truck, where the noise is comming from is the wiper govenor<delay module> which basisally it is the timer for the delay wipers. even though you are hearing this click I have rarely seen these go bad but I have replaced alot of wiper motors. On your wiper motor does it have two plugs or one big plug? There was an updated motor that came out in the late 90's switching the 2 plug to the single. You can try tapping the motor with a ratchet or small hammer to see if it will free up the brushes and on the two plug motor there is a goung that comes out of it and hooks to one of the mounting bolts, make sure that ground is good. if you have a test light check it to make sure, even though it may look good you have steel and alloys mixing which after they corrode causing bad connections. If you have the five wire ,i will give more details.

Basically as per 1993 Ford F350 model.
The motor is with two plugs.
Three mounting bolts with no ground.

You can remove the wiper cowl and make sure that the wiper linkage is broke or bound up causing this.

I suggest you to go through this wiring diagram for wiper components.

graphic

This will help.
Thanks.

See below latest solved car problems :----


How to Replace a Windshield Wiper Motor

Wipers not working, but hear relay click on Lincoln LS?

http://schematicsdiagram.blogspot.com/2011/12/wipers-not-workingbut-hear-relay-click.html

Car windshield wiper gets power for movement and stops?


How does cars Windshield Wiper System Works

http://technoanswers.blogspot.com/2011/11/how-does-cars-windshield-wiper-system.html


Where is wiper fuse located on1993 chevrolet suburban

http://technoanswers.blogspot.in/2012/02/where-is-wiper-fuse-located-on1993.html


Complete wiper components replacing details for Acura Car Models?

http://repairhelpcenter.blogspot.com/2011/11/complete-wiper-components-replacing.html


Gas gauge stuck on empty on 2002 Mercedes Benz 240c?


One common failure that can cause this problem here is the fuel level sensor itself in the fuel tank.
If it has an internal electrical failure then it will cause the fuel gage to default to empty like this.
This sensor is located in the fuel tank.
A dealer or shop would have to hook up their sds machine or scan tool to check for fault codes in your vehicles computer systems to see if a code is set for the sensor and to also check/test the sensor.
This sensor can cost around $150 and about 1.5 hours labor to have replaced.

This will help.
Thanks.

See below latest solved car problems :---


Heater blows intermittently and temp gauge goes erratic?

http://technoanswers.blogspot.com/2012/01/heater-blows-intermittently-and-temp.html


Temperature gauge does not move and no heat when heater is ON?

http://technoanswers.blogspot.com/2012/01/temperature-gauge-does-not-move-and-no.html


Temperature gauge keeps fluctuating up and down close to red?

http://technoanswers.blogspot.com/2012/01/temperature-gauge-keeps-fluctuating-up.html

Temperature gauge on the dash quit working on Pontiac Grand Prix?

http://technoanswers.blogspot.com/2012/01/temperature-gauge-on-dash-quit-working.html


Fuel gauge jumps from empty to full?

http://schematicsdiagram.blogspot.com/2011/12/fuel-gauge-jumps-from-empty-to-full.html

· Oldsmobile Temperature Gauge Lamp Switch?


Fuel gauge drops to Empty?

http://technoanswers.blogspot.com/2012/01/fuel-gauge-drops-to-empty.html


Dodge neon gauges not working?

http://technoanswers.blogspot.in/2012/02/dodge-neon-gauges-not-working.html


Temperature gauge went up?

Temperature gauge stays At cold on jaguar?

http://technoanswers.blogspot.in/2012/02/temperature-gauge-stays-at-cold-on.html


Where is the pcv valve located on 2007 Duratec ford focus xr5?

its behind/under the intake manifold, and its a nasty job changing it out.If you are under the front looking into the engine compartment, you can see it easier than trying to find it looking under the hood. The problem is reaching it.

you have to remove the intake manifold to get to it.
 most models have the PCV valve located in the crankcase ventilation oil seperator, which is mounted lower on the engine.


you need to raise the vehicle, put it on jackstands, remove the splash-shield, remove the intake manifold for access to the PCV valve, disconnect the PCV hose on the valve at the seperator, Push in the two tabs, and twist the PCV valve out.

As per service manual it says that on all models, SPI/Zetec/Duratec to test the valve, shake it vigorously. If it doesn't rattle, replace the valve.
It's the blue thing and is behind the intake manifold.

See the image shown below :---


One more image:---


This will help.
Thanks.

See below latest solved car problems :---


How to replace Drive Shaft bearing on Toyota pick up?

http://schematicsdiagram.blogspot.in/2012/02/how-to-replace-drive-shaft-bearing-on.html

Car suddenly died and won’t start?

http://technoanswers.blogspot.in/2012/02/car-suddenly-died-and-wont-start.html

Car is starting but not turning over?

http://technoanswers.blogspot.in/2012/02/car-is-starting-but-not-turning-over.html

Engine cranks but will not start?

http://technoanswers.blogspot.in/2012/02/engine-cranks-but-will-not-start.html

Exclamation indicator light on ford freestar dash?

http://technoanswers.blogspot.in/2012/02/exclamation-indicator-light-on-ford.html

2004 ford freestar van idles rough?

How to remove Intake Manifold Tuning Valve?

http://technoanswers.blogspot.com/2012/01/how-to-remove-intake-manifold-tuning.html

Trunk release Problem on Toyota Camry?

http://schematicsdiagram.blogspot.in/2012/02/trunk-release-problem-on-toyota-camry.html

CMFI details for GMC vehicles?

http://technoanswers.blogspot.com/2012/01/cmfi-details-for-gmc-vehicles.html

Mazda MPV cranks but will not start?

http://technoanswers.blogspot.com/2012/01/mazda-mpv-cranks-but-will-not-start.html

MAZDA MPV WILL CRANK BUT NOT TURN OVER TO START?

http://technoanswers.blogspot.com/2012/01/mazda-mpv-will-crank-but-not-turn-over.html

Freightliner fl112 fuse box diagram?

http://technoanswers.blogspot.com/2012/01/freightliner-fl112-fuse-box-diagram.html

Car will not turn the ignition to start?

http://technoanswers.blogspot.com/2012/01/car-will-not-turn-ignition-to-start.html

Car only starts when gas pedal is pressed?

http://technoanswers.blogspot.com/2012/01/car-only-starts-when-gas-pedal-is.html

How to compare pattern of left bank and right bank sensors?

http://schematicsdiagram.blogspot.in/2012/02/how-to-compare-pattern-of-left-bank-and.html

Check power train warning light on?

http://howtobyme.blogspot.in/2012/02/check-powertrain-warning-light-on.html

Check power-train message with orange engine light came on?

Check Powertrain message and Safety Mode Reduced Performance on Holden VZ Commodore?

http://howtobyme.blogspot.in/2012/02/check-powertrain-message-and-safety.html

Hyundai coupe f2 hazard fault?

http://schematicsdiagram.blogspot.com/2012/01/hyundai-coupe-f2-hazard-fault.html

Saturday, February 25, 2012

Crankshaft Position Sensor servicing and replacement procedure?

How to service crankshaft sensor and how to replace crankshaft position sensor.

For complete details the procedure is as follows :----


The following procedure can be considered a general procedure for most vehicles. Refer to the service manual for the procedure for you vehicle.
Crankshaft Sensor Adjustment on a General Motors Single Slot Sensor
If a single slot crankshaft sensor requires adjustment, follow this procedure:
CAUTION
Always be sure the ignition switch is off before attempting to rotate the crankshaft with a socket and breaker bar. If the ignition switch it on, the engine may start suddenly and rotate the socket and breaker bar with tremendous force. This action may result in personal injury and vehicle damage.
  • Be sure that the ignition switch is off.
  • Then rotate the crankshaft with a pull handle and socket installed on the crankshaft pulley nut.
  • Continue rotating the crankshaft until one of the interrupter blades is in the sensor and the edge of the interrupter window is at the edge of the defector on the pedestal.
  • Insert a crankshaft adjustment tool between each side of the blade and the sensor.
  • If the tool does not fit between each side of the blade and the sensor, adjustment is required.
  • The gap measurement should be repeated at all three blades.
  • If the sensor adjustment is necessary, loosen the pinch bolt and insert the adjusting tool between each side of the blade and the sensor.
  • Move the sensor as required to insert the gauge. Tighten the sensor pinch bolt to 30 in.lb. (3 to 7 Newton meters (N?M).
  • Rotate the crankshaft and recheck the gap at each blade.

To remove the sensor:
  • Disconnect the wiring harness.
  • Unbolt the sensor mounting bolt.
If the crankshaft timing sensor or the camshaft reference sensor is removed, follow this procedure when the sensor is replaced:
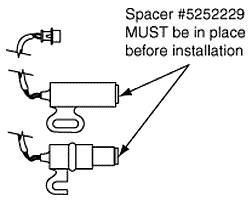
  • Thoroughly clean the sensor tip and install a new spacer on the sensor tip. New sensors should be supplied with the spacer installed.
Spacer on crankshaft timing sensor and camshaft position sensor.
  • Install the sensor until the spacer lightly touches the sensor ring, and tighten the sensor mounting bolt 105 in.lb.


This details will help.
Thanks.

See below latest solved car problems.


@